
If you are planning a new plastic injection molding project, understanding the injection mold manufacturing process can help you estimate lead time, prepare the right technical information, and avoid costly delays. From the initial RFQ and DFM review to mold design, machining, T1 trials, final inspection, and overseas delivery, every stage can affect the quality and schedule of your tooling project.
For overseas buyers, the process may seem complicated because many activities happen before the finished mold is shipped. A reliable injection mold manufacturer should provide clear communication and technical feedback throughout the project.
This guide explains the complete injection mold manufacturing process from RFQ to mold delivery, including the key steps buyers should understand before placing an order.
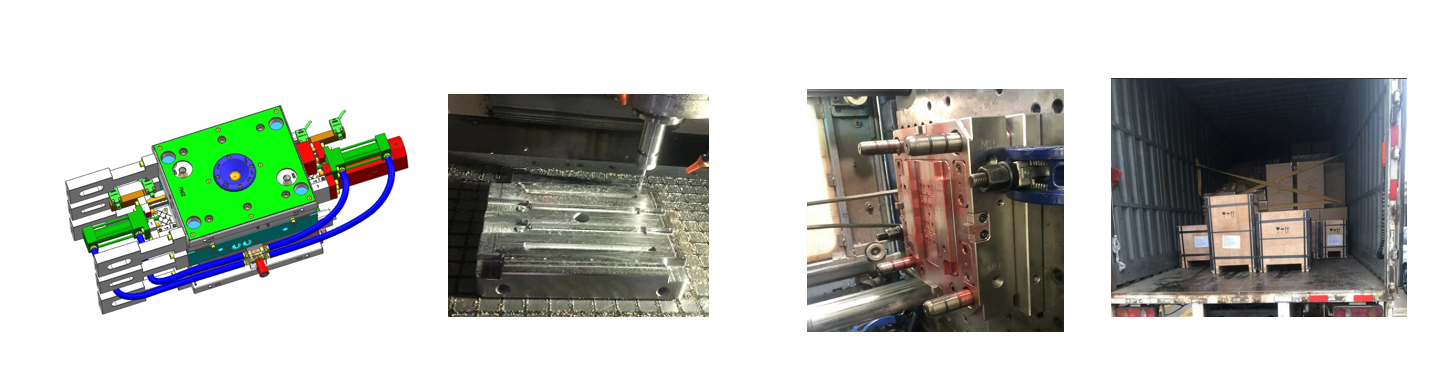
What Happens After You Send an Injection Mold RFQ?
The injection mold manufacturing process normally starts when the customer sends a request for quotation (RFQ).
A typical RFQ package may include:
- 3D product files
- 2D engineering drawings
- Plastic material specification
- Expected annual production volume
- Required mold life
- Surface finish requirements
- Mold standard requirements
- Number of cavities
- Injection molding machine information
- Delivery requirements
- Any special quality requirements
The more complete the information is, the more accurately the mold manufacturer can evaluate the project.
At this stage, the manufacturer should review not only the potential tooling cost but also the technical feasibility of the mold.
For example, the team may identify issues related to:
- Parting line
- Draft angles
- Wall thickness
- Undercuts
- Gate location
- Ejection
- Cooling
- Mold structure
- Material shrinkage
This initial review is important because problems discovered before mold manufacturing are usually much easier and less expensive to solve.
Step 1: RFQ and Project Review
Once the RFQ is received, the mold manufacturer reviews the product and project requirements.
Technical Review
The engineering team checks the product geometry and identifies the main manufacturing challenges.
Important questions include:
- Is the part suitable for injection molding?
- Where should the parting line be located?
- Does the part require sliders or lifters?
- What type of gate should be used?
- Is the wall thickness suitable?
- Can the part be ejected reliably?
- How should the mold be cooled?
- Is the required mold life achievable?
Commercial Review
The manufacturer also evaluates the commercial requirements.
These may include:
- Mold size
- Number of cavities
- Mold steel
- Mold standard
- Hot or cold runner
- Surface finish
- Tolerance requirements
- Expected production volume
- Delivery schedule
The goal is to establish a realistic quotation rather than simply provide a low initial price.
Step 2: DFM Analysis and Mold Feasibility Review
After the project is technically reviewed, a Design for Manufacturing (DFM) analysis is normally performed.
DFM helps identify potential manufacturing problems before the mold is built.
A DFM review may cover:
- Parting line
- Draft angle
- Wall thickness
- Ribs and bosses
- Gate position
- Ejection
- Sliders
- Lifters
- Venting
- Cooling
- Potential sink marks
- Potential warpage
- Weld line locations
The purpose is not simply to check whether the mold can be manufactured.
The goal is to determine whether the proposed mold can produce a stable, high-quality part.
For complex components, DFM feedback may lead to changes in the product design before tooling begins.
This is one reason why buyers should avoid approving a mold based only on price.
Step 3: Injection Mold Design
Once the DFM requirements are confirmed, the mold design process begins.
The mold designer develops the complete tooling structure based on the approved product geometry and project requirements.
The design may include:
- Mold base
- Core and cavity
- Parting line
- Runner system
- Gate system
- Cooling channels
- Ejection system
- Guide system
- Sliders
- Lifters
- Inserts
- Venting
- Mold components
The mold design must also consider the available injection molding machine.
Important machine requirements can include:
- Clamping force
- Mold dimensions
- Maximum mold opening
- Ejection stroke
- Nozzle position
- Injection unit requirements
A good mold design balances product quality, tooling cost, mold life, cycle time, and ease of maintenance.
For more information, see our Injection Mold Design Guide.
Step 4: Mold Design Approval
Before machining starts, the mold design should be reviewed and approved.
Depending on the project, the customer may receive:
- 3D mold design
- 2D mold drawings
- Mold structure images
- Gate layout
- Cooling layout
- Ejection layout
- Steel specification
- Mold component information
The customer should carefully review the design before giving final approval.
Particular attention should be paid to:
- Parting line
- Gate location
- Ejection marks
- Slider positions
- Lifter positions
- Cooling layout
- Mold dimensions
- Cavity numbering
- Mold standard
- Material specification
Once the mold design is approved, significant design changes later in the project may increase both cost and lead time.
Step 5: Mold Steel and Component Preparation
After design approval, the mold manufacturer prepares the mold steel and standard components.
The required steel depends on the application.
Factors that influence steel selection include:
- Expected mold life
- Plastic material
- Corrosion resistance
- Surface finish
- Production volume
- Wear resistance
- Part appearance
The manufacturer may also prepare:
- Guide pins
- Bushings
- Ejector pins
- Springs
- Inserts
- Sliders
- Lifters
- Cooling components
- Mold base components
At this stage, material certificates and component specifications may also be prepared according to the customer’s quality requirements.
Step 6: CNC and EDM Machining
After the mold materials and components are prepared, machining begins.
CNC Machining
CNC machining is used to manufacture many of the critical mold features.
Typical CNC operations include:
- Rough machining
- Semi-finishing
- Fine machining
- Core machining
- Cavity machining
- Electrode preparation
- Mold component machining
The machining strategy depends on the required tolerance, geometry, surface finish, and mold steel.
EDM Machining
EDM is particularly useful for complex features that are difficult or impossible to produce efficiently using conventional cutting tools.
EDM may be used for:
- Deep narrow features
- Sharp internal corners
- Complex cavities
- Small details
- Hard-to-machine areas
The combination of CNC and EDM allows mold manufacturers to produce complex tooling with high dimensional accuracy.
Step 7: Mold Assembly
After machining, the individual mold components are inspected and assembled.
The assembly process may include:
- Core and cavity fitting
- Mold base assembly
- Guide system installation
- Ejector system installation
- Slider installation
- Lifter installation
- Cooling connection
- Runner installation
- Insert installation
- Mold alignment
During assembly, engineers check whether the moving components operate smoothly.
The mold should open and close correctly without abnormal interference.
Ejector pins, sliders, lifters, and other moving components should also operate reliably.
Step 8: T1 Mold Trial
After assembly, the mold is ready for the first mold trial, commonly called T1.
T1 is an important milestone in the injection mold manufacturing process.
The purpose of T1 is to determine whether the newly manufactured mold can produce parts and identify areas requiring improvement.
During the first trial, engineers may evaluate:
- Mold opening and closing
- Filling behavior
- Injection pressure
- Gate performance
- Cooling
- Ejection
- Part dimensions
- Surface appearance
- Short shots
- Flash
- Sink marks
- Warpage
- Weld lines
The first trial is not always expected to produce a perfect final part.
Instead, T1 provides valuable information for mold optimization.
Step 9: T1 Sample Inspection and Mold Modification
After T1, the molded samples are inspected.
Depending on the project, inspection may include:
- Dimensional measurement
- Appearance inspection
- Functional testing
- Assembly testing
- Material verification
- Critical feature inspection
If problems are identified, the mold manufacturer determines the appropriate corrective action.
Typical modifications may involve:
- Gate adjustment
- Steel modification
- Ejector adjustment
- Venting improvement
- Cooling changes
- Slider modification
- Lifter adjustment
- Parting line correction
The customer and mold manufacturer should communicate clearly during this stage.
For more complex projects, multiple mold trials may be required before final approval.
Step 10: Final Mold Inspection and Acceptance
Once the molded parts meet the agreed requirements, the mold can proceed to final inspection and acceptance.
The final inspection may include:
- Mold dimensions
- Mold opening and closing
- Ejection operation
- Cooling circuit inspection
- Core and cavity condition
- Part dimensions
- Surface finish
- Mold components
- Spare parts
- Mold labeling
- Documentation
The customer may also perform a final part inspection before approving the tooling.
A formal acceptance process helps both parties confirm that the mold meets the agreed technical requirements.
For a detailed checklist, see our Injection Mold Acceptance Checklist.
Step 11: Mold Packing and Overseas Shipping
After final approval, the mold is prepared for delivery.
For international customers, mold packaging is particularly important because the tooling may travel a long distance before reaching the production facility.
Typical preparation may include:
- Mold cleaning
- Anti-rust treatment
- Moving-part protection
- Cooling port protection
- Mold closing and locking
- Documentation
- Spare parts packing
- Wooden case or export packaging
The packaging should protect the mold from:
- Moisture
- Corrosion
- Impact
- Contamination
- Improper handling
Shipping documents should also be prepared according to the agreed delivery terms.
For overseas customers, the mold manufacturer should clearly communicate:
- Packing dimensions
- Gross weight
- Shipping method
- Shipping date
- Tracking information
- Export documentation
The mold manufacturing project is not complete when the mold leaves the factory. Proper delivery and handover are also important parts of the overall process.
How Long Does Injection Mold Manufacturing Take?
Injection mold lead time depends on the mold complexity, steel, cavity count, part geometry, surface finish, and customer approval speed.
A simple mold may require significantly less time than a complex multi-cavity mold with sliders, lifters, inserts, or complex cooling.
A typical project may include:
| Project Stage | Typical Activity |
|---|---|
| RFQ | Technical and commercial review |
| DFM | Manufacturability analysis |
| Mold Design | 3D and 2D mold design |
| Approval | Customer design confirmation |
| Machining | CNC and EDM |
| Assembly | Mold fitting and assembly |
| T1 | First mold trial |
| Modification | Mold optimization |
| Final Inspection | Mold and part acceptance |
| Delivery | Packing and shipping |
The actual schedule should be confirmed for each project rather than relying on a standard number of days.
If lead time is a critical factor for your project, see our guide on Injection Mold Lead Time.
What Can Cause Injection Mold Manufacturing Delays?
Several factors can extend the project schedule.
Late Product Design Changes
Changes to the product after mold design approval can require significant rework.
Delayed Customer Approval
The mold cannot always move to the next stage until the customer approves the required drawings or samples.
Complex Mold Structure
Sliders, lifters, inserts, unscrewing mechanisms, hot runners, and complex cooling systems can increase manufacturing time.
Difficult Surface Finishes
High-polish surfaces, textures, and special finishes can require additional machining and polishing.
T1 Modification
If the first trial reveals dimensional or molding problems, additional modification and testing may be necessary.
Material Availability
Special mold steel or components may require additional procurement time.
For this reason, a realistic project schedule should include engineering review, customer approval, manufacturing, trials, modification, and delivery rather than only calculating machining time.
How Can Buyers Reduce Injection Mold Lead Time?
Customers can help shorten the project schedule by providing complete information at the beginning.
Provide Complete Product Data
Send the latest:
- 3D files
- 2D drawings
- Material information
- Production requirements
- Surface finish specifications
- Quality requirements
Finalize the Product Design Early
Avoid changing critical product geometry after mold design approval whenever possible.
Respond Quickly to DFM and Design Questions
Fast communication can prevent unnecessary waiting time.
Confirm Gate and Cosmetic Requirements Early
Gate location and appearance requirements can significantly influence mold design.
Define Acceptance Requirements Before Tooling
Agree on dimensional tolerances, appearance requirements, mold standards, and sample approval criteria before manufacturing starts.
What Should Buyers Check Before Mold Delivery?
Before accepting the finished mold, buyers should confirm that the tooling meets the agreed technical requirements.
Important checks include:
Mold Structure
Confirm that the actual mold matches the approved design.
Part Quality
Check:
- Dimensions
- Appearance
- Function
- Assembly
- Critical features
Mold Operation
Verify:
- Mold opening
- Ejection
- Sliders
- Lifters
- Cooling
- Runner system
Documentation
Depending on the project, documentation may include:
- Mold drawings
- Steel certificates
- Inspection reports
- Trial reports
- Part measurement reports
- Maintenance instructions
- Spare parts list
A structured acceptance process helps prevent misunderstandings after the mold has been shipped.
How to Choose an Injection Mold Manufacturer for Your Project
The lowest quotation is not necessarily the lowest overall project cost.
When evaluating a mold manufacturer, consider:
- Engineering capability
- DFM experience
- Mold design quality
- Machining equipment
- Quality control
- Mold trial capability
- Communication
- Project management
- Export experience
- After-sales support
A capable supplier should be able to explain the project process clearly and identify potential problems before manufacturing begins.
For overseas buyers, experience with international mold projects is also important because packaging, shipping, documentation, and communication can affect the final delivery.
How Fentormold Manages Injection Mold Projects from RFQ to Delivery
Fentormold supports customers through the complete injection mold manufacturing process, from initial RFQ and engineering review through mold design, machining, assembly, trial, inspection, and delivery.
Our project process focuses on:
- Clear technical communication
- Manufacturability review
- Practical mold design
- Precision machining
- Mold assembly
- T1 trial support
- Quality inspection
- Export preparation
For customers supplying projects from the United States and Europe, clear communication and predictable project management are particularly important.
If you have a new plastic injection mold project, you can contact Fentormold with your 3D model, 2D drawing, material specification, estimated production volume, and target delivery date.
Frequently Asked Questions
What is the first step in injection mold manufacturing?
The first step is normally the RFQ and technical project review. The mold manufacturer evaluates the product geometry, material, production requirements, mold structure, and expected tooling requirements before providing a quotation.
How long does it take to manufacture an injection mold?
The lead time depends on the mold complexity, cavity count, material, mold steel, surface finish, mechanisms, and customer approval speed. Simple molds can be completed faster than complex multi-cavity or high-precision tooling.
What happens during T1?
T1 is the first trial of the newly manufactured mold. Engineers use the trial to evaluate mold operation, filling, ejection, dimensions, appearance, and potential molding defects.
Is T1 the final stage of mold manufacturing?
Not always. T1 may identify issues that require mold modification or process optimization. Additional trials may be required before final approval.
What information should I provide for an injection mold RFQ?
A typical RFQ should include the 3D part model, 2D drawings, plastic material, annual production volume, required mold life, surface finish, cavity requirements, and any special technical requirements.
What should I check before accepting an injection mold?
Check the mold structure, molded part dimensions, appearance, ejection, cooling, moving components, documentation, and any agreed acceptance criteria.
Can Fentormold manufacture injection molds for overseas customers?
Yes. Fentormold supports overseas injection mold projects and can coordinate engineering, mold manufacturing, trial, inspection, export packing, and delivery.
Conclusion
The injection mold manufacturing process involves much more than machining a piece of steel.
A successful project typically moves through a series of connected stages:
RFQ → DFM → Mold Design → Design Approval → Material Preparation → CNC/EDM → Assembly → T1 → Modification → Final Inspection → Mold Delivery
Each stage can affect the final tooling quality, project cost, and delivery schedule.
For overseas buyers, choosing a mold manufacturer that can manage the complete process is especially important. Good engineering communication at the beginning can prevent expensive problems later, while proper inspection and acceptance procedures can help ensure that the finished mold is ready for production.
If you are planning a new injection mold project, send Fentormold your 3D model, drawings, material requirements, production volume, and target delivery date. We can review your requirements and help develop a practical tooling solution from RFQ to mold delivery.