
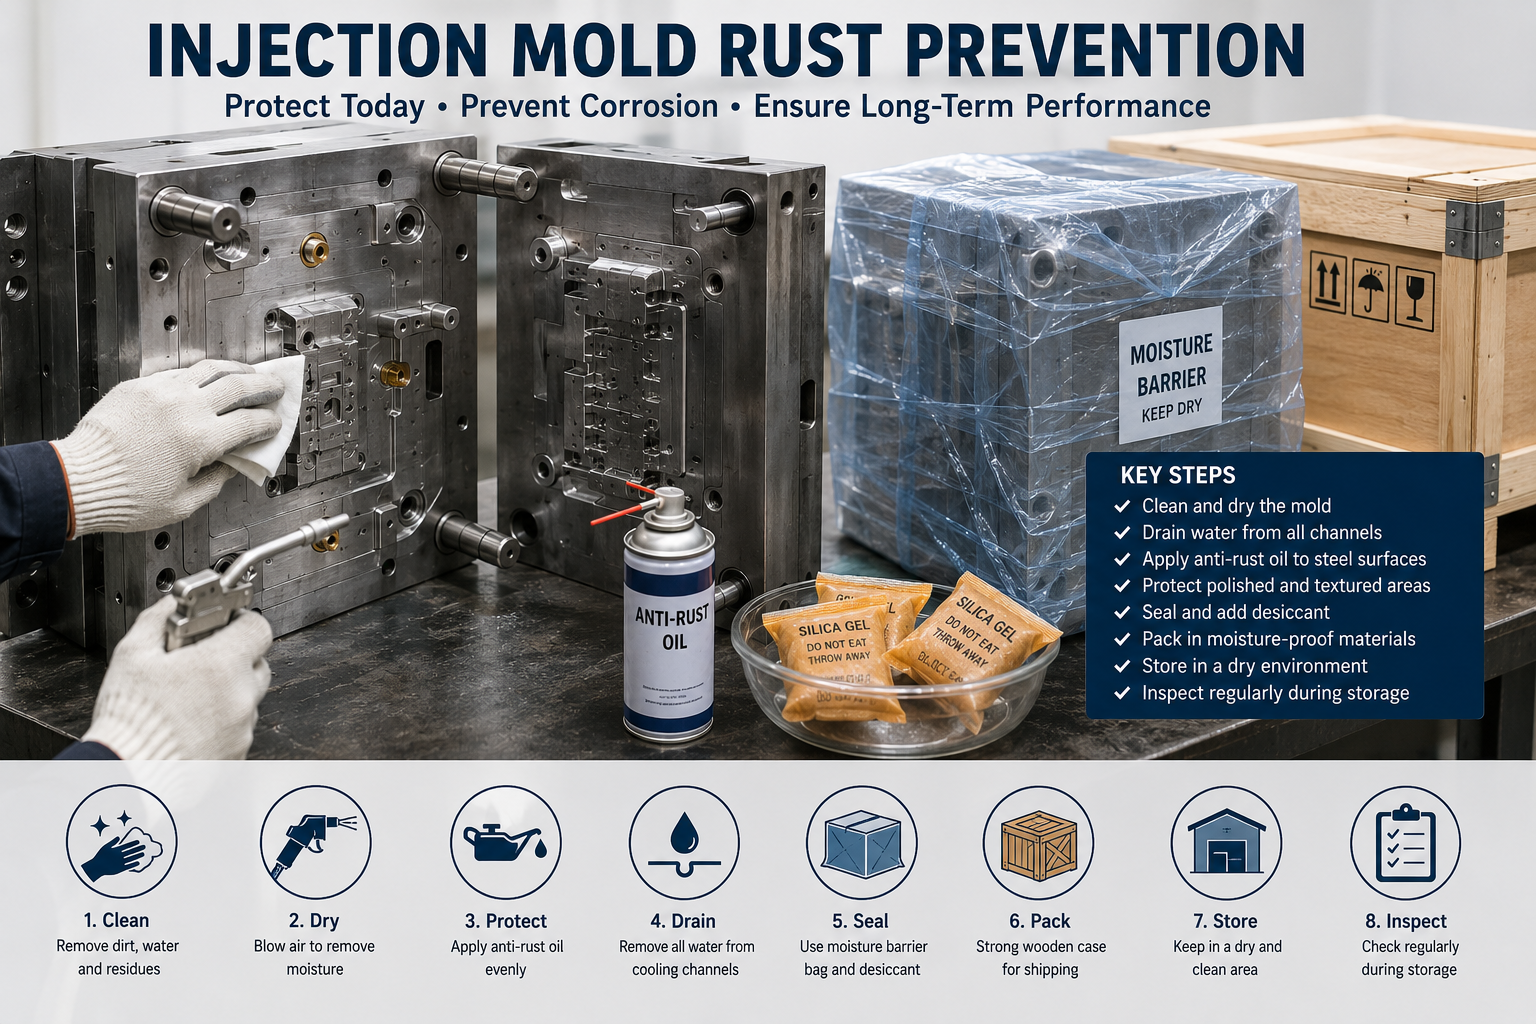
Injection mold rust prevention should start before the mold is packed or stored. A mold may look perfect after the final trial. However, moisture can still remain on the steel, inside cooling channels, or around moving parts. During storage or overseas shipping, that moisture may cause rust.
For export molds, the risk is higher. The tool may spend weeks at sea. After that, it may wait again before production starts.
At Fentor Mold, we treat rust protection as part of final mold preparation. It is not just a quick spray before closing the wooden case.
Why Injection Mold Rust Prevention Matters
Rust is not only a cosmetic problem.
Once corrosion appears on a precision surface, it can affect mold function and part quality.
For example, rust may damage:
- Cavity surfaces
- Core surfaces
- Shut-off areas
- Sliders
- Lifters
- Guide pins
- Ejector pins
- Cooling channels
- Polished surfaces
- Textured areas
A small rust spot on the mold base may not cause a serious problem.
However, corrosion on a sealing surface or polished cavity can require repair.
For this reason, injection mold rust prevention should focus first on critical steel surfaces.
Clean the Mold Before Applying Rust Protection
Do not apply anti-rust oil over dirt or water.
First, make sure the mold is clean and dry.
Remove:
- Water
- Fingerprints
- Dust
- Plastic residue
- Grease buildup
- Polishing compound
- Machining chips
Moisture trapped under oil can still cause corrosion.
Therefore, cleaning is just as important as the anti-rust product itself.
For polished or textured surfaces, use materials that will not scratch the finish.
Injection Mold Rust Prevention After the Final Trial
The final mold trial leaves water, oil, and molding residue on the tool.
So, the mold should not go directly into packing.
First, inspect the mold.
Next, clean the cavity, core, sliders, lifters, and parting surfaces.
Then dry the mold fully.
For export tooling, rust protection should be part of the full Injection Mold delivery process. Final trial, cleaning, inspection, protection, and packing should work together.
Also confirm that no cooling circuit still holds water.
Our guide on How We Prepare an Injection Mold for Overseas Shipping explains how final inspection, cleaning, rust protection, and export packing fit together before overseas shipment.
Drain Cooling Channels Completely
Cooling channels are easy to forget.
Even when the outside looks dry, water may still remain inside.
If the mold stays closed for weeks, that water can cause internal rust.
Therefore, after the final cooling check:
- Disconnect the water lines
- Drain each circuit
- Blow compressed air through every circuit
- Check sliders and lifters with cooling
- Check deep drilled channels
- Check cooling inserts
Continue until almost no water comes out.
For long storage, this step is critical.
In fact, internal corrosion can be much harder to repair than rust on an outside surface.
Protect Cooling Channels During Storage
After removing the water, keep the cooling channels clean and dry.
If storage will last a long time, extra protection may be needed.
The main goal is to prevent:
- Moisture
- Rust
- Dust
- Dirt
- Foreign material
Open water fittings should not stay exposed.
Instead, use suitable caps or plugs.
Before the mold returns to production, check or flush the circuits again if storage has been long.
Apply Anti-Rust Oil to Exposed Steel
Anti-rust oil creates a barrier between steel and moisture.
However, the amount should be controlled.
More oil is not always better.
Too much heavy oil can:
- Collect dust
- Enter small holes
- Contaminate the cavity
- Require more cleaning later
For normal export protection, apply a thin and even layer.
Pay extra attention to:
- Cavity steel
- Core steel
- Parting surfaces
- Inserts
- Slider surfaces
- Lifter surfaces
- Guide pins
- Exposed mold plates
Finally, choose the protection method based on the expected storage time.
Injection Mold Rust Prevention for Polished Surfaces
Mirror-polished cavities need special care.
Even a small corrosion mark can damage the final surface.
Therefore, do not touch these areas with bare hands after cleaning.
Fingerprints contain moisture and salts. Over time, they may leave marks on the steel.
Instead, use clean gloves when handling high-polish areas.
Also, choose an anti-rust product that is safe for precision mold surfaces.
Before production restarts, remove the protective oil carefully.
Protect Textured Mold Surfaces
Textured surfaces can also trap moisture.
Because the surface is not smooth, water or cleaning liquid may remain in the texture.
So, make sure the area is fully dry before applying protection.
Avoid heavy wiping because it may damage fine texture.
Instead, use a gentle cleaning and drying method.
In most cases, a light and even anti-rust layer is safer than a thick coating.
Sliders and Lifters Need Extra Attention
Sliders and lifters have many contact surfaces.
As a result, these areas can rust easily.
During injection mold rust prevention, inspect:
- Sliding surfaces
- Wear plates
- Guide areas
- Shut-offs
- Angle pins
- Lifter guides
First, remove moisture and dirty grease.
Then apply the correct lubricant or protection.
If the mold will sit for a long time, move the slider or lifter during preparation.
This helps spread protection across the working surface.
Guide Pins and Bushings
Guide pins and bushings also need protection.
Their fit is important for mold alignment.
If rust forms on a guide pin, the mold may become difficult to open or close.
Before storage:
- Clean the guide pins
- Check for scratches
- Apply suitable grease
- Confirm smooth movement
In addition, do not leave water or dirty oil around the bushings.
Otherwise, a small amount of corrosion can quickly become surface damage when the mold moves again.
Injection Mold Rust Prevention During Sea Freight
Sea freight creates a difficult environment for steel molds.
The trip may involve:
- High humidity
- Temperature changes
- Condensation
- Long transit time
- Port storage
Together, these conditions increase corrosion risk.
Therefore, export mold protection should include more than anti-rust oil.
Depending on the shipment, use:
- Moisture barrier wrapping
- Desiccant
- Sealed plastic protection
- Strong wooden crates
- Protection from direct water contact
At Fentor Mold, rust prevention is combined with moisture control and secure export packaging for overseas mold shipments.
Do Not Ignore Condensation
Condensation can form even when rain never touches the mold.
For example, a mold may move from a warm factory into a cooler environment.
As the temperature changes, moisture in the air can collect on the steel.
Therefore, a sealed but wet mold is still at risk.
Drying before packing is very important.
Desiccant can help control moisture. However, it should not replace proper cleaning and drying.
Close the Mold Carefully Before Storage
Before closing the mold, confirm that the cavity and core are protected.
Also, do not leave loose parts inside.
Check that:
- Sliders are in the correct position
- Lifters are fully returned
- Ejector system is returned
- Mold locking parts are installed
- Protective oil is applied
- No water remains
After that, close the mold smoothly.
If you use a thick rust-prevention coating, make sure it does not create unwanted pressure on precision surfaces.
Protect External Mold Surfaces
The cavity and core are not the only areas that can rust.
External plates, screws, lifting holes, and exposed steel also need protection.
This becomes more important when the mold will stay in storage for months.
Check:
- Top plate
- Bottom plate
- Side surfaces
- Lifting holes
- Water fittings
- Hydraulic connections
- Exposed screws
Although rust in these areas may not affect the molded part directly, it can make installation and maintenance harder.
Injection Mold Rust Prevention for Long-Term Storage
A mold stored for two weeks needs less protection than one stored for one year.
Therefore, long-term storage should include regular checks.
Do not assume one application of anti-rust oil will last forever.
At planned intervals, look for:
- Rust spots
- Dry protective surfaces
- Moisture
- Dirty grease
- Damaged wrapping
- Water inside channels
If needed, clean the mold and apply protection again.
The correct interval depends on humidity, storage conditions, and the product used.
Store the Mold in a Dry Area
Storage conditions also matter.
Do not place the mold directly on a wet floor.
Instead, keep it in a clean and dry area.
Avoid:
- Water leaks
- Outdoor storage
- High humidity
- Direct exposure to chemicals
- Large temperature changes
Use a pallet, rack, or suitable base to keep the mold off the floor.
For high-value molds, humidity control can provide extra protection.
Keep Mold Records During Storage
Mold records make long-term maintenance easier.
For stored tooling, record:
- Storage date
- Rust-prevention date
- Product used
- Water drained
- Last inspection date
- Next inspection date
- Storage location
This is especially useful when many molds are stored at the same time.
In addition, the final mold documentation should include maintenance and rust-prevention information.
Our Injection Mold Documentation: Buyer’s Checklist explains what buyers should keep for future mold operation and maintenance.
Check the Mold Before Production Restarts
A stored mold should not go directly back into production.
Instead, inspect it first.
Before startup:
- Remove anti-rust oil
- Clean cavity and core
- Check sliders and lifters
- Check ejector movement
- Check guide pins
- Check cooling channels
- Check for rust
- Lubricate moving parts
For molds returning to Injection Molding Production, check the cooling lines, moving parts, lubrication, and cavity surfaces before the first production run.
Then start the mold carefully.
If storage has been long, flush the cooling lines before production.
This helps keep dirt or rust out of the customer’s cooling system.
When Should Rust Be Repaired?
Very light surface rust may sometimes be removed with careful polishing.
However, precision areas need more care.
Do not aggressively polish:
- Shut-off surfaces
- Parting lines
- Textured surfaces
- Precision inserts
- Mirror-polished cavities
Removing too much steel can change the mold.
Therefore, inspect serious corrosion before starting repair.
Depending on the damage, the work may require polishing, fitting, welding, or replacement of a small insert.
As a result, early rust prevention is usually much cheaper than repairing damaged mold steel.
Injection Mold Rust Prevention Checklist
| Check Item | What to Confirm |
|---|---|
| Cavity and core | Clean, dry, and protected |
| Polished areas | No fingerprints or moisture |
| Textured areas | Fully dry |
| Cooling channels | Water removed |
| Water fittings | Closed or protected |
| Sliders | Clean and lubricated |
| Lifters | Clean and protected |
| Guide pins | Greased and rust-free |
| Parting surfaces | Anti-rust protection applied |
| Exterior steel | Protected where needed |
| Packaging | Moisture protection used |
| Desiccant | Added when required |
| Storage area | Dry and clean |
| Long storage | Inspection schedule recorded |
Final Thoughts
Injection mold rust prevention should begin before storage or export packing.
First, clean the mold.
Next, remove all water.
Then protect exposed steel.
Also pay extra attention to polished surfaces, sliders, lifters, guide systems, and cooling channels.
For overseas molds, moisture protection during sea transport is equally important.
At Fentor Mold, we treat rust prevention as part of the final mold-delivery process. Corrosion found after shipment can delay production and damage precision steel.
Therefore, a few careful steps before storage can prevent a much more expensive repair later.