
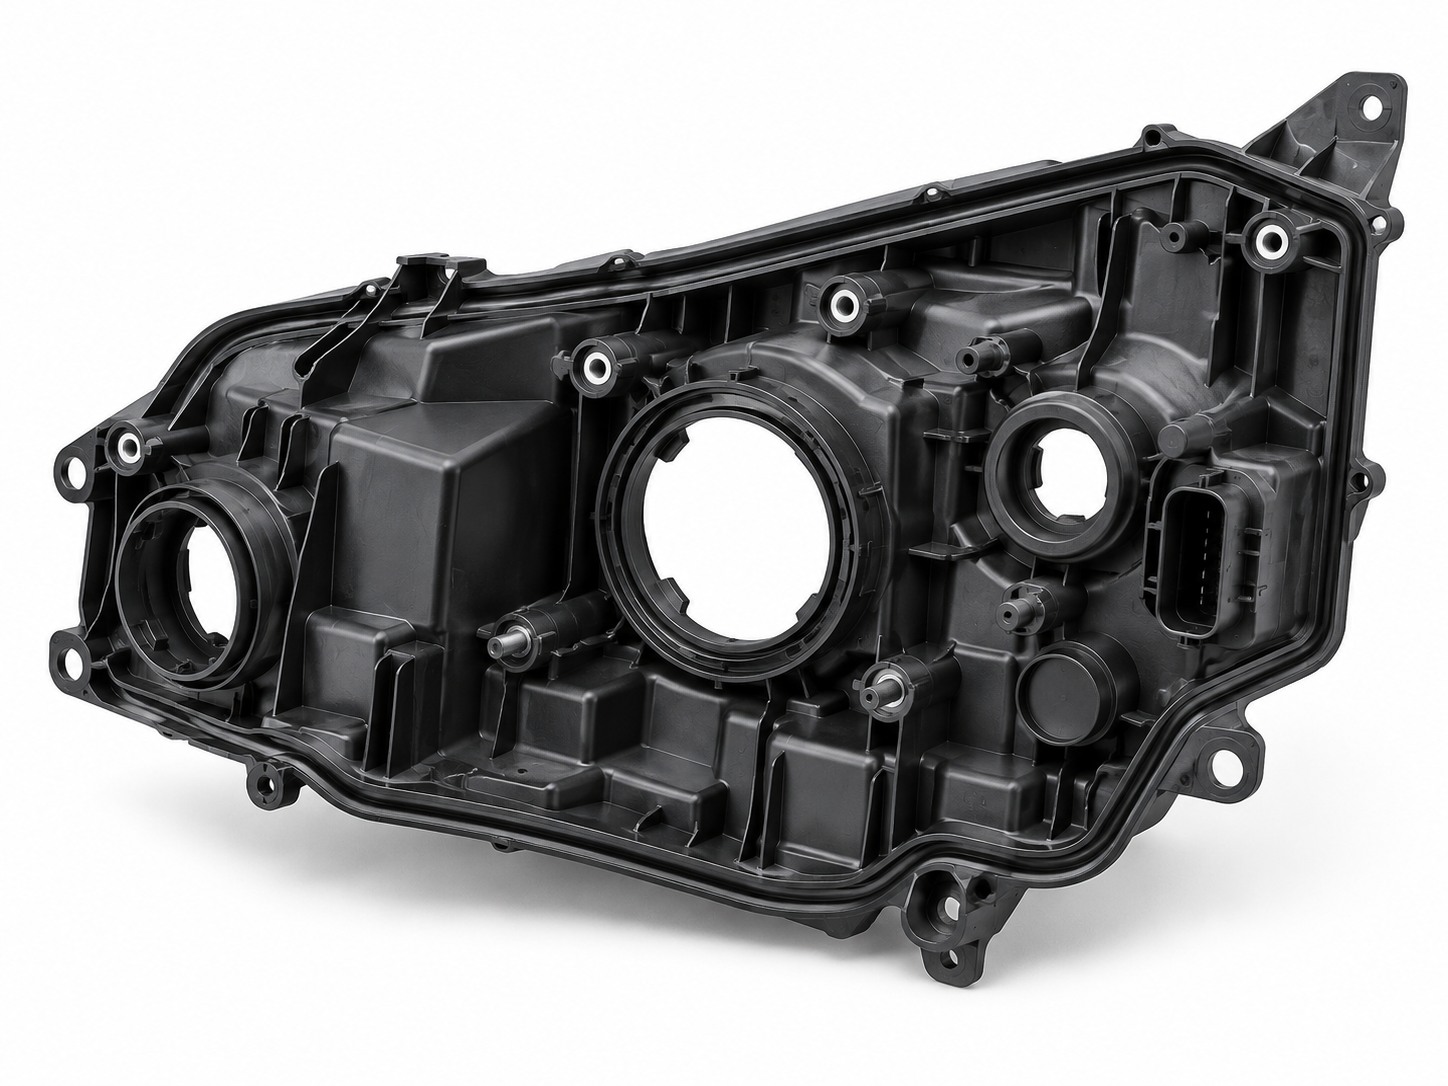
Automotive headlight housing injection molding requires careful control of part size, shape, and quality. A headlight housing must hold the lens, reflector, and other lighting parts in the correct position. It also needs to handle heat, vibration, and moisture.
However, headlight housings often have large, uneven shapes. They also contain ribs, bosses, mounting holes, and sealing areas. These features make mold design more difficult.
Poor mold design can cause warpage, sink marks, weak weld lines, or assembly problems. As a result, engineers must plan the material, gate location, cooling system, and mold structure before production begins.
This guide explains the main challenges and how to solve them.
What Is Automotive Headlight Housing Injection Molding?
Automotive headlight housing injection molding is the process of making plastic headlight bodies with an injection mold.
The housing forms the main support structure of a vehicle headlamp assembly. It connects several parts and helps protect the lighting system.
Common features include:
- Lens sealing surfaces
- Reflector mounting points
- Screw bosses
- Reinforcing ribs
- Electrical connector openings
- Ventilation features
- Mounting brackets
- Bulb or LED module openings
Unlike a clear headlight lens, the housing is usually an opaque plastic part.
Its main job is to provide support, keep parts in position, and help form a sealed assembly.
Therefore, strength and dimensional accuracy are often more important than a high-gloss surface finish.
Best Materials for Automotive Headlight Housing Injection Molding
Material selection has a major effect on headlight housing quality.
The plastic must handle heat, vibration, and changes in temperature. It must also maintain its shape during assembly and use.
Common material options include PP, filled PP, PC/ABS, and selected PBT grades.
PP and Talc-Filled PP
PP is light, affordable, and easy to process.
For some headlight housings, manufacturers use talc-filled PP to improve stiffness and reduce unwanted movement.
Main advantages:
- Low material cost
- Low weight
- Good chemical resistance
- Suitable for large molded parts
- Improved stiffness with suitable fillers
However, PP can lose stiffness at high temperatures. It can also shrink or warp during cooling.
Therefore, the exact PP grade must match the housing’s heat and dimensional needs.
PC/ABS for Headlight Housings
PC/ABS combines useful properties from polycarbonate and ABS.
It offers good toughness and can provide better heat performance than standard ABS, depending on the grade.
Key benefits include:
- Good impact resistance
- Useful dimensional stability
- Good strength
- Suitable surface quality
- Heat-resistant grades available
However, PC/ABS normally needs proper drying before molding.
Poor drying may cause surface defects or damage the material during processing.
In addition, engineers should check the selected grade’s heat and aging performance.
PBT for Automotive Lighting Parts
PBT is another engineering plastic used in automotive lighting parts.
It offers good heat resistance, chemical resistance, and dimensional stability.
Glass-filled PBT can provide added stiffness for some structural parts.
However, glass fibers may cause uneven shrinkage. This can increase the risk of warpage.
The correct fiber content depends on the shape and strength requirements.
Headlight Housing Material Comparison
| Material | Main Benefit | Main Challenge |
|---|---|---|
| PP | Low cost and weight | Heat and shrinkage control |
| PP + Talc | Better stiffness | Filling and warpage |
| PC/ABS | Good toughness | Drying and process control |
| PBT | Heat and dimensional performance | Grade selection and shrinkage |
| PBT + GF | Higher stiffness | Fiber-related warpage |
No material is best for every headlight housing.
For example, a large rear housing may use filled PP. A smaller part near a hot light source may need a different resin.
Therefore, material selection should start with the working temperature, sealing method, and customer requirements.
Key Challenges in Automotive Headlight Housing Injection Molding
Headlight housings have complex shapes and tight assembly needs.
Even small molding defects can affect how the final headlamp fits together.
1. Headlight Housing Warpage
Warpage is one of the main problems in automotive headlight housing injection molding.
A housing may look correct when it leaves the mold. However, after cooling, one side may bend or twist.
Common causes include:
- Uneven wall thickness
- Poor gate location
- Uneven cooling
- Different shrinkage rates
- Poor packing control
- Fiber orientation
- Early ejection
Large housings are especially sensitive to these problems.
For example, a long sealing edge may bend after cooling. This can leave an uneven gap between the housing and lens.
How to reduce warpage:
First, keep the main wall thickness as even as possible. Next, avoid large changes between thick and thin areas.
A balanced cooling system can also reduce temperature differences.
In addition, Moldflow analysis can help predict shrinkage and warpage before mold machining.
For more details, read our guide on How to Prevent Injection Molding Warpage After Cooling.
2. Sealing Surface Accuracy
The sealing area is one of the most important features of a headlight housing.
It connects the plastic housing to the front lens.
Depending on the design, the assembly may use a gasket, adhesive, or another joining method.
If the sealing surface is not flat or has too much variation, the joint may fail.
Possible problems include:
- Water leakage
- Dust entering the lamp
- Poor lens fit
- Uneven seal compression
- Assembly gaps
Therefore, engineers should pay close attention to the sealing groove and surrounding structure.
The mold also needs stable cooling near this area.
Furthermore, parting lines, flash, and ejector marks should not affect the critical sealing surface.
3. Mounting Hole and Boss Accuracy
Headlight housings often contain several mounting points.
These features connect the lamp to the vehicle body and hold internal lighting parts.
However, the mounting points may sit far apart on a large housing.
If the part warps, the distance between the holes can change.
This may cause problems during assembly.
To improve accuracy:
- Use suitable boss wall thickness
- Add support ribs where needed
- Avoid thick plastic sections
- Control shrinkage
- Check mounting hole positions
- Use stable mold inserts
In addition, engineers should measure the part after it reaches the agreed inspection condition.
A housing may continue to change slightly after leaving the mold.
4. Sink Marks Around Ribs and Bosses
Sink marks often appear near thick areas.
For example, a screw boss may connect to a thinner housing wall. The thick boss cools more slowly than the wall.
As a result, the nearby surface may develop a visible sink mark.
Deep sink marks may also affect part dimensions.
To reduce this risk, engineers should avoid heavy solid sections.
Instead, use hollow bosses and suitable reinforcing ribs.
Good packing and cooling can also help improve the result.
However, process changes cannot fully correct poor part geometry.
5. Weld Lines and Air Traps
Headlight housings contain many ribs, holes, and support features.
When melted plastic flows around these features, separate flow fronts may meet.
This can create weld lines.
A weld line near a mounting bracket may reduce its strength.
Meanwhile, trapped air can cause short shots, burn marks, or weak filling.
To prevent these defects:
- Review gate locations
- Improve runner balance
- Add suitable venting
- Avoid flow restrictions
- Check difficult filling areas
- Use Moldflow analysis when needed
The goal is to keep weak flow joints away from highly stressed features when possible.
Automotive Headlight Housing Mold Design
Good mold design helps control part quality and production cost.
Because headlight housings are often large and complex, the mold may need several moving parts.
At Fentor Mold, we review product structure, parting lines, undercuts, and cooling requirements during the DFM stage.
This helps reduce problems before mold manufacturing begins.
Gate Location and Runner Design
Gate location affects how plastic fills the housing.
For a large part, poor gate placement may cause long flow paths, high pressure, or uneven packing.
Therefore, engineers should check:
- Flow length
- Material type
- Wall thickness
- Weld-line position
- Gate marks
- Packing balance
- Possible warpage
A hot runner system may be useful for some large production molds.
However, the final choice depends on the material, production volume, and tooling budget.
A cold runner may also be suitable for simpler or lower-volume projects.
Cooling System Design
Cooling is one of the most important parts of headlight housing mold design.
Large housings often have deep sections, thick bosses, and different wall heights.
These areas may cool at different speeds.
As a result, poor cooling can increase warpage and cycle time.
A good cooling system should provide stable temperature control around the main cavity.
For difficult areas, engineers may use:
- Separate cooling circuits
- Cooling baffles
- Bubblers
- Special cooling inserts
- Local temperature control
However, each cooling solution must suit the mold structure and available space.
Slider and Lifter Design
Automotive headlight housings may contain side holes, hooks, and undercuts.
These features can prevent the part from leaving the mold directly.
Therefore, sliders or lifters may be needed.
For example, a side connector opening may require a slider.
A hidden locking hook may need a lifter or moving insert.
The mold designer must also check the travel distance and available steel thickness.
Poor slider design may cause flash, wear, or part damage.
Ejection Design
Large plastic housings can be difficult to eject.
If the ejector system applies too much force to a thin area, the part may bend or crack.
Therefore, ejector pins should act on strong sections whenever possible.
In addition, the mold needs enough draft to release the housing smoothly.
For deep areas, proper polishing and surface treatment can help reduce sticking.
Ejection should not damage mounting features or critical sealing surfaces.
Mold Steel Selection
P20 and 1.2738 are common choices for many large automotive housing molds.
However, the final steel selection depends on the production volume, material, surface finish, and mold life target.
For local areas with high wear or repeated movement, harder inserts may be useful.
For example, slider contact areas and small shut-off surfaces may need stronger steel.
Good mold steel selection can improve durability and reduce maintenance.
For more design details, see our Automotive Injection Mold Design Guide.
How to Prevent Headlight Housing Injection Molding Defects
Even a well-made mold needs stable processing conditions.
The table below shows common defects and practical solutions.
| Defect | Common Cause | Possible Solution |
|---|---|---|
| Warpage | Uneven cooling or shrinkage | Improve cooling and gate balance |
| Sink marks | Thick bosses and ribs | Improve wall design and packing |
| Flash | Poor mold fitting | Check shut-offs and injection pressure |
| Short shots | Poor filling or venting | Improve gate and vent design |
| Weld lines | Flow fronts meeting | Review gate location and flow path |
| Burn marks | Trapped air | Improve venting |
| Poor hole position | Shrinkage or deformation | Improve mold and process control |
| Difficult ejection | Poor draft or undercuts | Improve release and ejection design |
However, adjusting machine settings is not always enough.
For example, longer cooling time may reduce warpage. Yet it cannot fully solve an unsuitable rib design.
Therefore, the first step is to find the real cause of the defect.
How to Test Automotive Headlight Housing Quality
A headlight housing must fit well with other lamp parts.
For this reason, testing should cover more than appearance.
Important checks include:
Dimensional Inspection
Measure critical areas such as:
- Mounting holes
- Sealing surfaces
- Reflector support points
- Lens joining areas
- Connector openings
- Overall housing shape
CMM inspection or suitable fixtures can help check part dimensions.
Assembly Testing
The housing should fit the lens and internal components without excess force.
Engineers should check for gaps, interference, and poor alignment.
A full assembly trial can reveal issues that simple part inspection may miss.
Environmental Testing
Depending on the vehicle program, tests may include:
- High-temperature exposure
- Low-temperature exposure
- Temperature cycling
- Vibration testing
- Water leakage testing
- Dust protection testing
- Material aging tests
The final test conditions should follow the customer’s specifications and the intended vehicle application.
How to Reduce Automotive Headlight Housing Mold Cost
Headlight housing molds can be expensive because of their size and complex structure.
However, early design work can help control costs.
Simplify unnecessary undercuts. Small product changes may reduce the number of sliders or lifters.
Optimize the gate layout. Better filling can reduce molding defects and future mold changes.
Improve cooling early. Good cooling can reduce cycle time and warpage.
Use suitable mold steel. Select steel based on the actual mold life and production needs.
Review the part before machining. DFM analysis can identify difficult features and help avoid expensive corrections.
Fentor Mold provides custom injection mold manufacturing for automotive and industrial parts.
In addition, our injection molding production services can support customers who need finished plastic components after tooling development.
Conclusion
Automotive headlight housing injection molding requires good material selection, accurate mold design, and stable processing conditions.
Warpage, sealing surface accuracy, sink marks, and mounting hole position are among the main challenges.
However, many of these problems can be reduced through early DFM review, Moldflow analysis, balanced cooling, and proper gate design.
A reliable headlight housing mold should produce parts with stable dimensions, good assembly fit, and consistent quality.
By solving these issues before production, automotive suppliers can reduce mold changes, improve part quality, and support smooth mass production.