
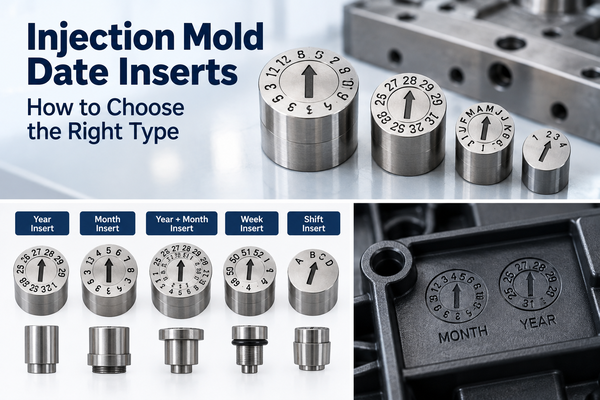
Injection mold date inserts help manufacturers track when plastic parts are made. They add a small date code to each part during molding. As a result, factories can check production dates without printing labels.
However, choosing the wrong insert can cause unclear marks, poor fit, or extra mold work. Therefore, it is important to select the right type, size, and material.
At Fentor Mold, we consider date marking needs during mold design. This helps customers improve part tracking and reduce changes after mold production.
What Are Injection Mold Date Inserts?
Injection mold date inserts are small metal parts fitted into a mold. They mark the production date directly on plastic parts.
Most inserts have numbers and a small arrow. The numbers show the month or year, while the arrow points to the correct value.
For example, an insert may show month 10 and year 26. This can help identify a part made in October 2026.
Some inserts also mark the production week, day, or work shift.
Unlike printed labels, molded date marks form part of the plastic surface. Therefore, they do not need a separate printing step.
Why Are Injection Mold Date Inserts Important?
Date inserts offer several benefits for plastic part production.
1. Better Product Tracking
A date code helps identify when a part was made.
If a quality issue appears, the manufacturer can check the related production records.
As a result, the team can find affected parts more quickly.
2. Easier Quality Control
Date marks can support quality checks and product tracking.
For example, automotive suppliers may need to identify parts from different production periods.
However, a date code alone may not identify the exact production batch. Some projects also need a cavity number or lot code.
3. Lower Marking Cost
Mold date inserts mark parts during the molding cycle.
Therefore, factories may not need a separate date printing process.
This can save time and reduce extra handling.
4. Easy Date Changes
Many inserts allow workers to change the date without replacing the whole insert.
As a result, the mold can support regular production updates.
Common Types of Injection Mold Date Inserts
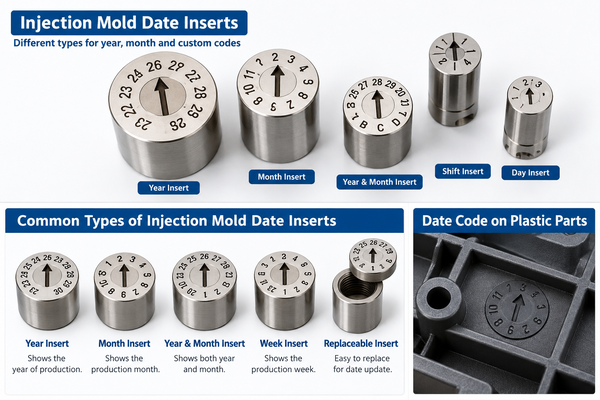
Several types of injection mold date inserts are available. Each type serves a different marking need.
1. Year Date Inserts
Year inserts show the year of production.
They are useful when customers only need basic production tracking.
However, a year mark may not provide enough detail for high-volume production.
2. Month Date Inserts
Month inserts show the production month.
Most designs use numbers from 1 to 12. An arrow points to the current month.
For example, the arrow points to 6 for June.
These inserts are common in household products, plastic housings, and industrial parts.
3. Year and Month Date Inserts
This type combines the year and month in one marking area.
It helps users check both values without using two separate inserts.
Therefore, it can save space on smaller plastic parts.
However, the design must leave enough room for clear numbers.
4. Day, Week, and Shift Inserts
Some projects need more detailed production records.
In these cases, manufacturers can use inserts that show the day, week, or work shift.
For example, a shift code can help identify which production team made the part.
These inserts are useful when the factory needs closer process tracking.
5. Adjustable Date Inserts
Adjustable inserts allow workers to change the date using the insert’s adjustment feature.
Many designs use a rotating center with a small arrow.
However, the adjustment method depends on the insert design. Always follow the supplier’s instructions.
6. Replaceable Date Inserts
Replaceable inserts allow users to remove or change certain parts of the date stamp.
For example, some designs offer front access. This can make service easier.
As a result, maintenance may take less time.
How to Choose Injection Mold Date Inserts
Choosing the correct insert depends on the plastic part, mold structure, and tracking needs.
1. Choose the Right Date Code
First, decide how much information the customer needs.
For simple household products, a month and year code may be enough.
However, automotive or other controlled production projects may need more details.
Therefore, confirm the marking rules before selecting the insert.
2. Select the Correct Insert Size
Injection mold date inserts come in different diameters.
Common catalog sizes include 4, 6, 8, 10, 12, 16, and 20 mm. However, the available sizes depend on the supplier and series.
Small inserts save space, but their marks may be harder to read.
Larger inserts offer more room for numbers.
Before selecting a size, check the part’s marking area and wall design.
3. Check the Insert Material
Most date inserts use hardened steel or stainless steel.
These materials offer good wear resistance for normal molding.
However, glass-filled plastics can wear the marked surface over time.
Therefore, check the insert hardness, material, and expected mold life.
4. Check the Mold Temperature
Not all date inserts can work at the same temperature.
For example, some standard DME date inserts have a maximum operating temperature of 150°C.
However, other designs may have different ratings.
Always check the supplier’s data before using an insert in a high-temperature mold.
5. Check the Installation Method
Some inserts use a press fit, while others use screws or special fixing methods.
The correct choice depends on the mold structure.
For example, a front-removable insert may help when the rear of the mold is hard to reach.
However, the fixing method must keep the insert secure during molding.
Injection Mold Date Insert Size Guide
The table below shows common size choices.
| Insert Diameter | Possible Use |
|---|---|
| 4–6 mm | Small plastic parts with limited space |
| 8–10 mm | General plastic parts and housings |
| 12–16 mm | Medium and large molded parts |
| 20 mm | Large marking areas or complex date codes |
These are general guidelines, not fixed design rules.
The final size depends on the insert series, code layout, and available space.
How to Install Injection Mold Date Inserts
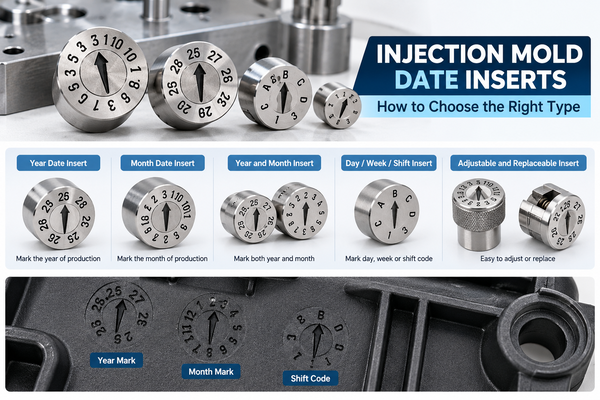
Correct installation helps prevent marking problems and insert movement.
1. Check the Hole Size
Measure the insert before machining the mounting hole.
The hole must match the supplier’s fit requirements.
If the fit is too loose, the insert may move. However, an overly tight fit can damage the insert or stop its center from turning.
2. Check the Installation Depth
The insert face should sit at the correct height.
For many applications, the insert must be flush with the mold surface.
If it sits too high or too low, it may leave an unwanted mark on the plastic part.
3. Check the Marking Direction
The date code must face the correct way on the finished part.
Therefore, engineers should check the text direction before final installation.
This is especially important for visible plastic parts.
4. Test the Date Mark
After installation, check the date mark during mold trials.
Make sure the numbers and arrows are clear.
Also, check whether the insert leaves flash, a step, or other surface marks.
If needed, adjust the insert before mass production.
Common Injection Mold Date Insert Problems
Even a small insert can cause problems if the design or installation is poor.
Unclear Date Marks
The numbers may look too light or difficult to read.
Possible causes include poor filling, shallow engraving, or surface wear.
Therefore, check both the insert and the molding process.
Insert Movement
A loose insert may move during molding.
This can affect the mark and may damage the mold surface.
To prevent this, use the correct fixing method.
Flash Around the Insert
Plastic may enter a gap around the insert.
As a result, flash can appear near the date code.
Check the fit, insert condition, and mold pressure.
Difficult Date Adjustment
Some inserts become hard to turn after long use.
Dirt, wear, or excessive installation pressure may cause this problem.
Therefore, inspect the insert before applying force.
Wrong Date Code
Workers may forget to update the date.
To prevent this, include the date stamp in the production start-up checklist.
Injection Mold Date Inserts for Different Industries
Different industries have different marking needs.
Automotive Parts
Automotive plastic parts often need clear production records. Date inserts can support part tracking and quality control.
Household Products
Plastic storage boxes, kitchen tools, and other household products may use month and year marks.
Electronic Products
Plastic housings may use compact date inserts because marking space is limited.
Industrial Plastic Parts
Industrial parts may need extra codes to show the production shift, cavity, or period.
In each case, the correct date insert depends on the customer’s tracking plan.
How Much Do Injection Mold Date Inserts Cost?
The cost depends on the insert type, size, material, and supplier.
Standard year or month inserts are usually simpler than special date marking systems.
In addition, front-removable or multi-ring designs may cost more.
However, the insert price is only one part of the total cost.
You should also consider:
- Mounting hole machining
- Installation time
- Future date changes
- Insert replacement
- Mold maintenance
For long production runs, a more service-friendly design may reduce total maintenance cost.
What Should You Check Before Ordering Date Inserts?
Before placing an order, confirm the following details:
- Required year, month, day, or shift code
- Insert outside diameter and length
- Mold operating temperature
- Insert material and hardness
- Mounting and fixing method
- Required marking depth
- Date adjustment method
- Spare insert needs
- Supplier standard and part number
Also, check whether the selected insert fits the planned mold layout.
For custom projects, these details should form part of the mold design review.
At Fentor Mold, we review standard components during injection mold manufacturing.
Customers who need custom mold components can also read our guide on choosing injection mold insert suppliers.
Conclusion
Injection mold date inserts are small parts, but they play an important role in product tracking.
The right insert makes date marking clear and easy to manage.
When selecting an insert, check the type, size, material, temperature rating, and installation method.
In addition, plan future date changes before mold production.
Need Help with Injection Mold Design?
Fentor Mold provides custom injection mold design, mold manufacturing, and mold component services.
If you need a new plastic mold or help selecting mold components, visit the Fentor Mold website and send us your drawings for review.
x
Injection mold date inserts help manufacturers track when plastic parts are made. They add a small date code to each part during molding. As a result, factories can check production dates without printing labels.
However, choosing the wrong insert can cause unclear marks, poor fit, or extra mold work. Therefore, it is important to select the right type, size, and material.
At Fentor Mold, we consider date marking needs during mold design. This helps customers improve part tracking and reduce changes after mold production.
What Are Injection Mold Date Inserts?
Injection mold date inserts are small metal parts fitted into a mold. They mark the production date directly on plastic parts.
Most inserts have numbers and a small arrow. The numbers show the month or year, while the arrow points to the correct value.
For example, an insert may show month 10 and year 26. This can help identify a part made in October 2026.
Some inserts also mark the production week, day, or work shift.
Unlike printed labels, molded date marks form part of the plastic surface. Therefore, they do not need a separate printing step.
Why Are Injection Mold Date Inserts Important?
Date inserts offer several benefits for plastic part production.
1. Better Product Tracking
A date code helps identify when a part was made.
If a quality issue appears, the manufacturer can check the related production records.
As a result, the team can find affected parts more quickly.
2. Easier Quality Control
Date marks can support quality checks and product tracking.
For example, automotive suppliers may need to identify parts from different production periods.
However, a date code alone may not identify the exact production batch. Some projects also need a cavity number or lot code.
3. Lower Marking Cost
Mold date inserts mark parts during the molding cycle.
Therefore, factories may not need a separate date printing process.
This can save time and reduce extra handling.
4. Easy Date Changes
Many inserts allow workers to change the date without replacing the whole insert.
As a result, the mold can support regular production updates.
Common Types of Injection Mold Date Inserts
Several types of injection mold date inserts are available. Each type serves a different marking need.
1. Year Date Inserts
Year inserts show the year of production.
They are useful when customers only need basic production tracking.
However, a year mark may not provide enough detail for high-volume production.
2. Month Date Inserts
Month inserts show the production month.
Most designs use numbers from 1 to 12. An arrow points to the current month.
For example, the arrow points to 6 for June.
These inserts are common in household products, plastic housings, and industrial parts.
3. Year and Month Date Inserts
This type combines the year and month in one marking area.
It helps users check both values without using two separate inserts.
Therefore, it can save space on smaller plastic parts.
However, the design must leave enough room for clear numbers.
4. Day, Week, and Shift Inserts
Some projects need more detailed production records.
In these cases, manufacturers can use inserts that show the day, week, or work shift.
For example, a shift code can help identify which production team made the part.
These inserts are useful when the factory needs closer process tracking.
5. Adjustable Date Inserts
Adjustable inserts allow workers to change the date using the insert’s adjustment feature.
Many designs use a rotating center with a small arrow.
However, the adjustment method depends on the insert design. Always follow the supplier’s instructions.
6. Replaceable Date Inserts
Replaceable inserts allow users to remove or change certain parts of the date stamp.
For example, some designs offer front access. This can make service easier.
As a result, maintenance may take less time.
How to Choose Injection Mold Date Inserts
Choosing the correct insert depends on the plastic part, mold structure, and tracking needs.
1. Choose the Right Date Code
First, decide how much information the customer needs.
For simple household products, a month and year code may be enough.
However, automotive or other controlled production projects may need more details.
Therefore, confirm the marking rules before selecting the insert.
2. Select the Correct Insert Size
Injection mold date inserts come in different diameters.
Common catalog sizes include 4, 6, 8, 10, 12, 16, and 20 mm. However, the available sizes depend on the supplier and series.
Small inserts save space, but their marks may be harder to read.
Larger inserts offer more room for numbers.
Before selecting a size, check the part’s marking area and wall design.
3. Check the Insert Material
Most date inserts use hardened steel or stainless steel.
These materials offer good wear resistance for normal molding.
However, glass-filled plastics can wear the marked surface over time.
Therefore, check the insert hardness, material, and expected mold life.
4. Check the Mold Temperature
Not all date inserts can work at the same temperature.
For example, some standard DME date inserts have a maximum operating temperature of 150°C.
However, other designs may have different ratings.
Always check the supplier’s data before using an insert in a high-temperature mold.
5. Check the Installation Method
Some inserts use a press fit, while others use screws or special fixing methods.
The correct choice depends on the mold structure.
For example, a front-removable insert may help when the rear of the mold is hard to reach.
However, the fixing method must keep the insert secure during molding.
Injection Mold Date Insert Size Guide
The table below shows common size choices.
| Insert Diameter | Possible Use |
|---|---|
| 4–6 mm | Small plastic parts with limited space |
| 8–10 mm | General plastic parts and housings |
| 12–16 mm | Medium and large molded parts |
| 20 mm | Large marking areas or complex date codes |
These are general guidelines, not fixed design rules.
The final size depends on the insert series, code layout, and available space.
How to Install Injection Mold Date Inserts
Correct installation helps prevent marking problems and insert movement.
1. Check the Hole Size
Measure the insert before machining the mounting hole.
The hole must match the supplier’s fit requirements.
If the fit is too loose, the insert may move. However, an overly tight fit can damage the insert or stop its center from turning.
2. Check the Installation Depth
The insert face should sit at the correct height.
For many applications, the insert must be flush with the mold surface.
If it sits too high or too low, it may leave an unwanted mark on the plastic part.
3. Check the Marking Direction
The date code must face the correct way on the finished part.
Therefore, engineers should check the text direction before final installation.
This is especially important for visible plastic parts.
4. Test the Date Mark
After installation, check the date mark during mold trials.
Make sure the numbers and arrows are clear.
Also, check whether the insert leaves flash, a step, or other surface marks.
If needed, adjust the insert before mass production.
Common Injection Mold Date Insert Problems
Even a small insert can cause problems if the design or installation is poor.
Unclear Date Marks
The numbers may look too light or difficult to read.
Possible causes include poor filling, shallow engraving, or surface wear.
Therefore, check both the insert and the molding process.
Insert Movement
A loose insert may move during molding.
This can affect the mark and may damage the mold surface.
To prevent this, use the correct fixing method.
Flash Around the Insert
Plastic may enter a gap around the insert.
As a result, flash can appear near the date code.
Check the fit, insert condition, and mold pressure.
Difficult Date Adjustment
Some inserts become hard to turn after long use.
Dirt, wear, or excessive installation pressure may cause this problem.
Therefore, inspect the insert before applying force.
Wrong Date Code
Workers may forget to update the date.
To prevent this, include the date stamp in the production start-up checklist.
Injection Mold Date Inserts for Different Industries
Different industries have different marking needs.
Automotive Parts
Automotive plastic parts often need clear production records. Date inserts can support part tracking and quality control.
Household Products
Plastic storage boxes, kitchen tools, and other household products may use month and year marks.
Electronic Products
Plastic housings may use compact date inserts because marking space is limited.
Industrial Plastic Parts
Industrial parts may need extra codes to show the production shift, cavity, or period.
In each case, the correct date insert depends on the customer’s tracking plan.
How Much Do Injection Mold Date Inserts Cost?
The cost depends on the insert type, size, material, and supplier.
Standard year or month inserts are usually simpler than special date marking systems.
In addition, front-removable or multi-ring designs may cost more.
However, the insert price is only one part of the total cost.
You should also consider:
- Mounting hole machining
- Installation time
- Future date changes
- Insert replacement
- Mold maintenance
For long production runs, a more service-friendly design may reduce total maintenance cost.
What Should You Check Before Ordering Date Inserts?
Before placing an order, confirm the following details:
- Required year, month, day, or shift code
- Insert outside diameter and length
- Mold operating temperature
- Insert material and hardness
- Mounting and fixing method
- Required marking depth
- Date adjustment method
- Spare insert needs
- Supplier standard and part number
Also, check whether the selected insert fits the planned mold layout.
For custom projects, these details should form part of the mold design review.
At Fentor Mold, we review standard components during injection mold manufacturing.
Customers who need custom mold components can also read our guide on choosing injection mold insert suppliers.
Conclusion
Injection mold date inserts are small parts, but they play an important role in product tracking.
The right insert makes date marking clear and easy to manage.
When selecting an insert, check the type, size, material, temperature rating, and installation method.
In addition, plan future date changes before mold production.
Need Help with Injection Mold Design?
Fentor Mold provides custom injection mold design, mold manufacturing, and mold component services.
If you need a new plastic mold or help selecting mold components, visit the Fentor Mold website and send us your drawings for review.