
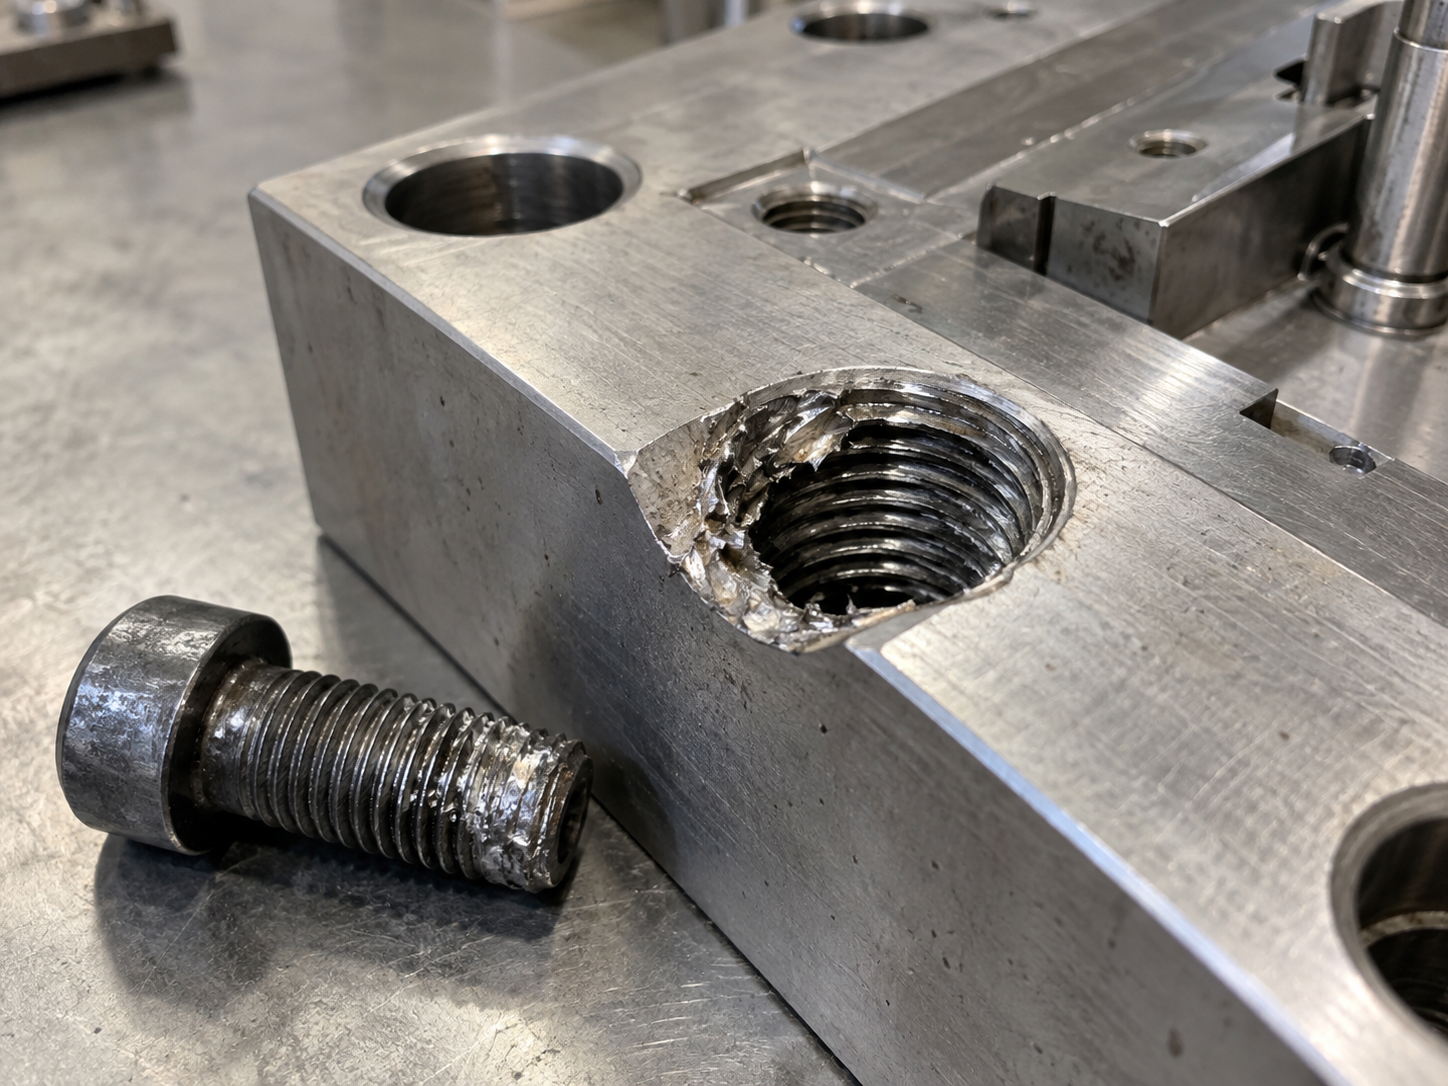
Injection mold thread damage is a common maintenance problem in molds that have been opened, repaired, or adjusted many times.
A damaged thread may look minor at first. However, if a screw cannot hold the correct clamping force, inserts, wear plates, sliders, support blocks, or other mold components may become loose.
As a result, alignment changes, abnormal wear, flash, or even mold collision can occur.
Therefore, the main question is not only how to repair the thread. The more important question is whether the damaged area can still provide reliable strength.
At Fentor Mold, we normally check the thread condition, load, component location, remaining steel, and repair history before deciding whether to repair or replace the part.
What Causes Injection Mold Thread Damage?
Injection mold thread damage usually develops from repeated assembly, excessive tightening, wear, corrosion, or poor repair practice.
Common causes include:
- Over-tightening screws
- Cross-threading during assembly
- Repeated mold maintenance
- Wrong screw size
- Poor thread engagement
- Soft steel around the threaded hole
- Corrosion or rust
- Broken screws
- Misalignment between components
- Excessive load on the fastener
In many cases, the thread does not fail suddenly.
Instead, technicians may first notice that the screw feels loose or no longer reaches the expected tightening torque.
This is often the first warning sign.
Common Types of Injection Mold Thread Damage
Not all injection mold thread damage is the same.
The repair method depends on the type and severity of the damage.
| Thread Damage | Typical Condition |
|---|---|
| Partial thread wear | Screw still holds but feels loose |
| Stripped thread | Screw turns without tightening |
| Cross-threaded hole | Thread shape is damaged |
| Broken screw inside hole | Fastener cannot be removed normally |
| Cracked thread area | Steel around hole is damaged |
| Oversized damaged hole | Original thread cannot be restored easily |
| Repeated repaired thread | Previous repair has failed |
Therefore, the first step is to identify the actual condition instead of immediately re-tapping the hole.
1. Partially Worn Threads
Partial wear is often the easiest injection mold thread damage to repair.
The thread may still hold, but the fit is no longer tight.
Typical signs include:
- Screw becomes loose quickly
- Tightening torque feels lower
- Metal particles appear during removal
- Thread edges look worn
- Screw movement feels uneven
If enough original thread remains, the hole may sometimes be cleaned and re-tapped.
However, this only works when the damage is limited.
If the root of the thread is already badly worn, re-tapping the same size may remove even more material without restoring enough strength.
2. Completely Stripped Thread
A stripped thread is more serious.
The screw may rotate freely without producing clamping force.
At this stage, the original thread usually cannot be trusted.
Possible repair options include:
- Install a thread insert
- Use a larger thread size
- Replace the local insert
- Replace the complete component
The correct choice depends on the load and location.
For example, a stripped thread in a small cover plate is less critical than a stripped thread that holds a slider locking block.
Therefore, load level should always be considered.
3. Cross-Threaded Holes
Cross-threading often happens during assembly.
If the screw enters at an angle, the first few thread turns can be damaged.
In mild cases, technicians may restore the thread with the correct tap.
However, if the hole has been badly cut or widened, the thread may no longer have enough engagement.
As a result, the fastener can loosen during production.
For critical components, it is better to restore the full thread strength rather than only making the screw fit again.
4. Broken Screws Inside the Mold
Broken screws can create a more difficult repair.
The remaining screw section may be below the surface.
Possible removal methods include:
- EDM removal
- Drilling
- Screw extractor
- Local machining
However, the surrounding thread must also be checked after removal.
If the removal process damages the hole, the thread may need additional repair.
At Fentor Mold, EDM is often preferred for difficult broken screws because it can remove hardened fasteners while limiting damage to the surrounding component.
When Can Injection Mold Thread Damage Be Repaired?
Some injection mold thread damage can be repaired safely.
Repair is usually reasonable when:
- Damage is local
- Enough steel remains around the hole
- The component is not cracked
- Load is moderate
- Repair does not weaken nearby geometry
- The hole has not been repaired many times before
- The repaired thread can provide full engagement
In these cases, a proper repair can extend the component life.
However, the repair method must match the load.
A quick re-tap may be acceptable for a low-load cover.
It may not be acceptable for a high-load locking component.
Repair Option 1: Re-Tapping the Original Thread
Re-tapping is the simplest repair.
It is suitable only when the thread damage is light.
The process may include:
- Clean the hole.
- Remove damaged burrs.
- Check screw alignment.
- Run the correct tap through the thread.
- Check thread engagement.
- Test the screw torque.
The main advantage is that the original screw size can remain unchanged.
However, re-tapping does not add new material.
Therefore, if much of the original thread is already missing, this method does not restore full strength.
Repair Option 2: Use a Thread Insert
A thread insert can be a good solution for stripped or weak threads.
The damaged hole is machined to a larger size. Then a metal insert is installed to create a new internal thread.
Common systems include:
- Helical wire inserts
- Solid threaded inserts
- Key-locking inserts
This method can provide strong and repeatable thread engagement.
It is useful when the original component is still in good condition.
However, enough wall thickness must remain around the repair area.
If the hole is too close to an edge, cooling channel, cavity, or another machined feature, a larger repair hole may create new risks.
Repair Option 3: Increase the Thread Size
Another option is to machine the damaged hole to the next larger thread size.
For example, an M8 thread may be changed to M10 if the structure allows it.
This can be strong and simple.
However, it also changes the original mold design.
The new screw head may be larger.
Counterbores may also need modification.
In addition, the mating component must accept the new fastener.
Therefore, this repair is best used when there is enough space.
Repair Option 4: Replace a Local Mold Insert
Sometimes the damaged thread is inside a removable insert.
In this case, replacing the insert may be more reliable than repairing the thread repeatedly.
This is especially useful when:
- The insert is already worn
- Several holes are damaged
- The insert is easy to remake
- Alignment is critical
- The thread carries high load
A new insert restores both the thread and the surrounding geometry.
Therefore, replacement may provide better long-term reliability.
When Should the Mold Component Be Replaced?
Repair is not always the best choice.
A mold component should normally be replaced when:
- Thread damage is severe
- Steel around the hole is cracked
- The same area has been repaired repeatedly
- Too little material remains
- The fastener carries high structural load
- The repair would weaken nearby features
- The component already has other wear or damage
- Failure could cause mold collision
For example, a damaged thread in a slider locking component should be treated carefully.
If the locking block becomes loose, the slider may move during injection.
This can damage both the mold and the molded part.
Therefore, component replacement may be cheaper than a future mold repair.
Injection Mold Thread Damage in High-Load Areas
Some threaded holes carry much more load than others.
High-risk areas may include:
- Slider locking blocks
- Heel blocks
- Wear plates
- Large inserts
- Support blocks
- Hydraulic cylinder mounts
- Mechanical stops
- Mold clamps
In these locations, thread strength directly affects mold stability.
Therefore, injection mold thread damage in high-load areas should not be treated like a cosmetic repair.
The repaired thread must provide reliable clamping force.
If there is any doubt, replacing the component is often safer.
Check the Screw Too
Sometimes the thread hole is not the only problem.
The screw may also be damaged.
Common screw problems include:
- Stretched threads
- Worn screw head
- Bent screw
- Wrong strength grade
- Incorrect length
- Damaged first thread
Installing a damaged screw into a repaired hole can quickly damage the new thread.
Therefore, replace questionable screws at the same time.
This is a small cost compared with repairing the mold again.
Prevent Injection Mold Thread Damage During Assembly
Good assembly practice can reduce injection mold thread damage.
Technicians should:
- Start screws by hand
- Avoid cross-threading
- Use the correct screw length
- Apply correct tightening torque
- Keep threads clean
- Remove rust and contamination
- Use suitable anti-seize where required
- Replace damaged screws early
Power tools should also be used carefully.
High torque can strip a thread very quickly.
For precision mold components, final tightening should be controlled rather than based only on feel.
Avoid Repeated Removal When Possible
Some mold components are opened frequently during maintenance.
This repeated assembly can slowly wear the thread.
If a component must be removed often, designers can consider:
- Stronger thread inserts
- Larger thread engagement
- Better screw access
- More durable steel
- Replaceable threaded inserts
This is especially useful for maintenance covers, hot runner plates, and frequently adjusted components.
Good design can reduce future thread repairs.
How Much Thread Engagement Is Enough?
Thread engagement is important for fastener strength.
A very shallow threaded hole may fail even if the thread itself looks perfect.
The required depth depends on:
- Screw diameter
- Steel strength
- Fastener grade
- Load
- Installation direction
- Frequency of removal
Therefore, technicians should not shorten screws without checking the available thread depth.
A screw that only engages a few thread turns may strip the hole under load.
Injection Mold Thread Damage After Previous Repair
Previous repairs should always be reviewed.
A hole that already contains a repair insert may fail again.
At that point, the available repair options become more limited.
Possible choices include:
- Install a larger insert
- Machine and plug the hole
- Move the thread position
- Replace the component
Repeated repairs can gradually remove more steel.
Therefore, at some point, replacement becomes more reliable than another repair.
Repair or Replace? Quick Decision Table
| Condition | Repair | Replace |
|---|---|---|
| Light thread wear | ✓ | |
| Minor cross-threading | ✓ | |
| Local stripped thread | ✓ | |
| Enough steel for insert | ✓ | |
| Cracked surrounding steel | ✓ | |
| Repeated repair failure | ✓ | |
| High-load critical component | Maybe | Often |
| Several damaged holes | Maybe | ✓ |
| Component also worn | ✓ | |
| Collision risk if failure occurs | ✓ |
The decision should focus on reliability rather than repair cost alone.
A cheap repair that fails again may create much higher production cost later.
Check Related Mold Components
Thread damage may be a symptom of another problem.
For example, a locking block screw may loosen because the block is receiving abnormal impact.
Likewise, a wear plate screw may fail because the slider is not moving correctly.
Therefore, technicians should also inspect:
- Contact surfaces
- Component alignment
- Wear marks
- Impact loading
- Slider movement
- Plate movement
If the mold has repeated mechanical problems, related articles such as injection mold slide jamming can help identify the root cause.
Injection Mold Thread Damage Inspection Checklist
When injection mold thread damage is found, check:
| Inspection Item | What to Check |
|---|---|
| Thread condition | Wear, stripping, cracking |
| Screw condition | Damage or stretching |
| Hole alignment | Correct screw entry |
| Steel thickness | Enough material for repair |
| Component load | Low or high load |
| Repair history | Previous insert or re-tap |
| Nearby features | Cooling or machined areas |
| Component wear | Other damage present |
| Failure risk | Could it cause collision? |
This simple review helps avoid repeated repairs.
Final Thoughts
Injection mold thread damage should not be repaired based only on whether a screw can tighten again.
The real question is whether the repaired connection can still provide reliable strength during production.
Light damage can often be restored by re-tapping or installing a proper thread insert.
However, severe damage, cracked steel, repeated repair failure, or high-load locations may require component replacement.
Therefore, always consider load, remaining steel, repair history, and failure risk together.
At Fentor Mold, we prefer a reliable long-term repair over a quick temporary fix. In some cases, replacing one damaged mold component is the safest and most economical solution.