
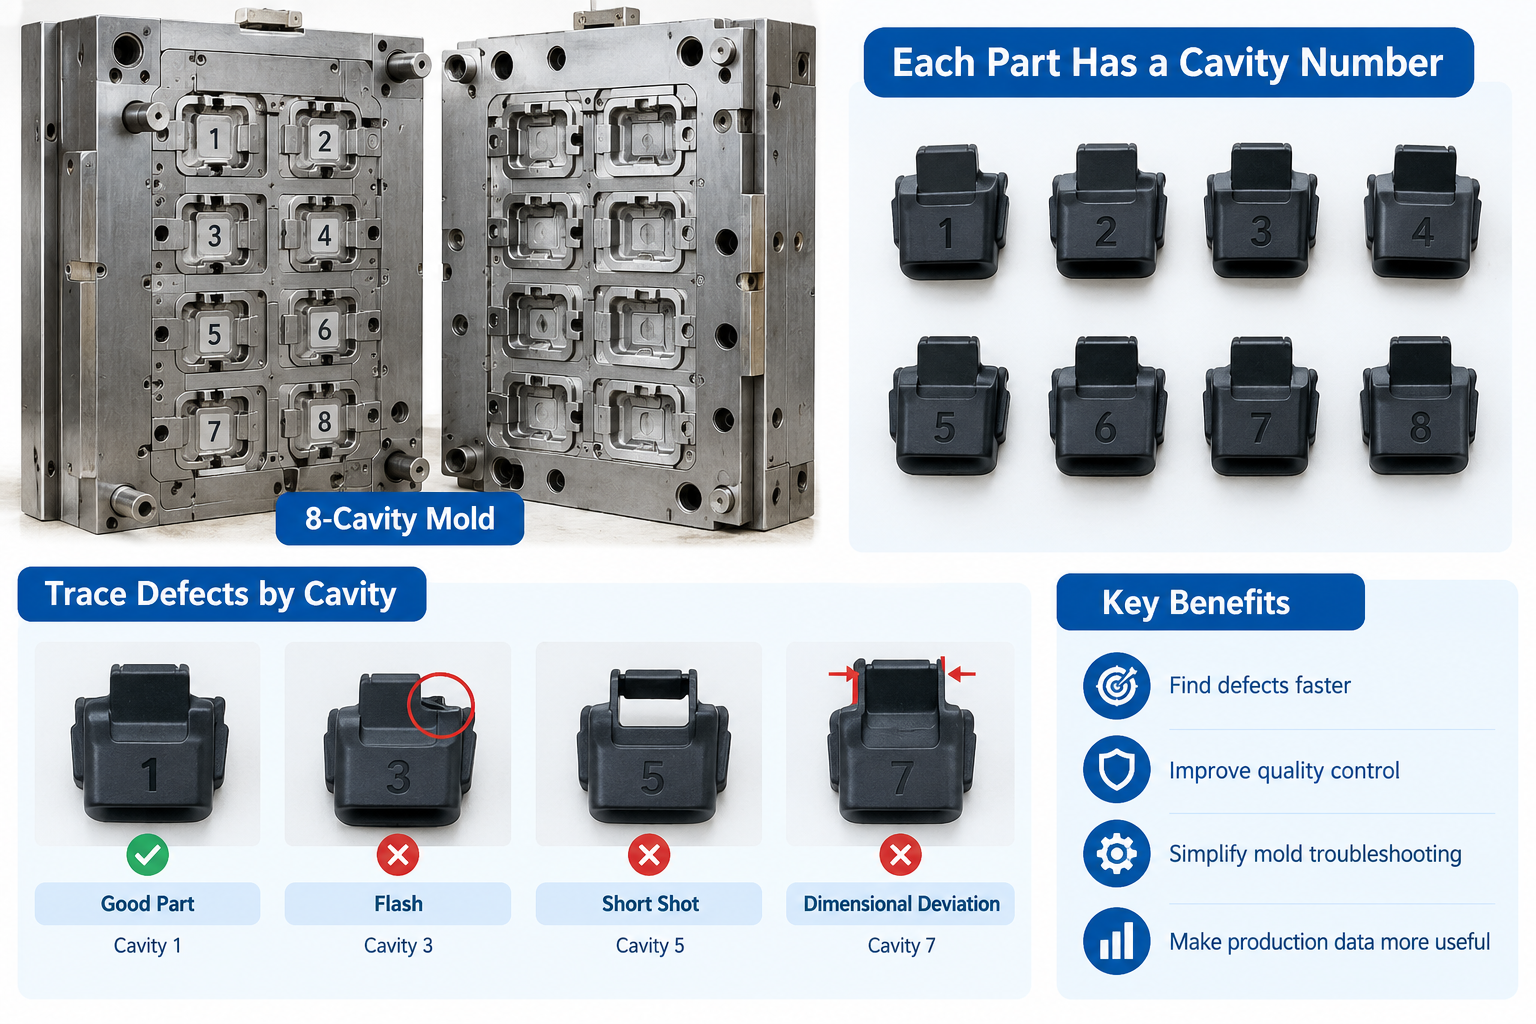
Multi-cavity injection molding can improve production efficiency and reduce part cost. However, it also creates one practical quality-control problem: when a defect appears, how do you know which cavity produced the bad part?
If every molded part looks the same, a problem from one cavity can easily mix with good parts from the others.
As a result, troubleshooting becomes slower.
For multi-cavity molds, adding a simple cavity number to each part is one of the easiest ways to improve traceability and quality control.
Why Cavity Identification Matters in Multi-Cavity Injection Molding
Imagine an 8-cavity mold producing the same plastic component.
Seven cavities are producing good parts, while cavity 6 has a small problem.
For example, it may have:
- Slight flash
- A short shot
- A dimensional deviation
- A gate problem
- A damaged ejector pin
- Local scratches
- A cooling issue
If every part has a cavity number, the quality team can quickly see that most rejected parts come from cavity 6.
Therefore, the investigation can focus on that cavity first.
Without cavity identification, all eight cavities may need to be checked.
This is why cavity numbering is simple but very useful in mass production.
What Is a Cavity ID?
A cavity ID is usually a small number or code molded directly onto the plastic part.
For example:
- 1
- 2
- 3
- 4
or:
- C1
- C2
- C3
- C4
The number shows which cavity produced the part.
For an 8-cavity mold, cavity 1 produces parts marked “1,” cavity 2 produces parts marked “2,” and so on.
Usually, the mark is placed in a non-cosmetic area. Therefore, it does not affect appearance or function.
For many industrial plastic parts, a simple engraved number is enough.
Multi-Cavity Injection Molding Does Not Mean Every Cavity Behaves the Same
A multi-cavity mold is designed so every cavity produces the same part.
In reality, small differences can still appear.
For example, one cavity may have slightly different:
- Gate dimensions
- Cooling efficiency
- Venting
- Steel fitting
- Ejector clearance
- Insert position
- Surface condition
At first, these differences may be very small.
However, wear can make them larger over time.
This is especially common around moving parts and high-wear areas.
Therefore, when a quality problem appears, it is important to know whether it affects every cavity or only one.
Multi-Cavity Injection Molding and Dimensional Problems
Dimensional problems are one of the strongest reasons to identify cavities.
Suppose a 4-cavity mold produces a part with one critical dimension:
20.00 ±0.10 mm
During inspection, the measurements are:
| Cavity | Measurement |
|---|---|
| Cavity 1 | 20.03 mm |
| Cavity 2 | 20.05 mm |
| Cavity 3 | 20.09 mm |
| Cavity 4 | 20.04 mm |
All four cavities still pass.
However, cavity 3 is already much closer to the upper tolerance limit.
If this trend continues, cavity 3 may become the first cavity to produce rejected parts.
Without cavity identification, these measurements may be mixed together in one report.
As a result, the warning sign can easily be missed.
In multi-cavity injection molding, cavity-by-cavity dimensional data makes it easier to see whether one cavity is starting to drift before the whole batch is affected.
For tighter-tolerance projects, this becomes even more important.
You can also see our guide on injection molding tolerances for the main factors that affect molded-part dimensions.
How Multi-Cavity Injection Molding Helps Trace Flash
Flash is another common example.
Suppose rejected parts repeatedly show flash in the same location.
If the parts have cavity IDs, inspection may show:
- Cavity 1: good
- Cavity 2: good
- Cavity 3: flash
- Cavity 4: good
Now the moldmaker knows where to look.
For example, possible causes around cavity 3 may include:
- Damaged shut-off
- Poor insert fitting
- Local parting line damage
- Worn ejector hole
- Steel deformation
Therefore, there is no need to adjust every cavity or modify the whole mold.
Instead, the technician can work directly on the problem area.
This can save a lot of troubleshooting time.
Short Shots Can Also Be Cavity-Specific
In multi-cavity injection molding, short shots do not always affect every cavity equally.
One cavity may fill later because of:
- Runner imbalance
- Gate restriction
- Poor venting
- Different cavity pressure
- Local temperature difference
If operators only increase injection pressure, the weak cavity may fill better.
However, the other cavities may then develop flash or become over-packed.
Therefore, increasing pressure is not always the right solution.
First, identify which cavity has the short shot.
Next, check why that cavity behaves differently.
In many cases, the real issue is runner balance, gate condition, or venting.
Cavity Numbers Make Production Data More Useful
A quality report becomes much more useful when inspection data includes cavity information.
Instead of recording:
3 rejected parts out of 100
the report can show:
3 rejected parts, all from cavity 5
That small detail changes the value of the report.
Now the engineering team knows where to start.
The same approach can be used for:
- Dimensional inspection
- Appearance defects
- Part weight
- Functional testing
- Assembly problems
Over time, the production history may show that one cavity has a repeated issue.
Because of this, maintenance can be planned before the problem becomes serious.
Multi-Cavity Injection Molding During Mold Trials
Cavity ID should not only be used after mass production starts.
It is also useful during mold trials.
During T1, T2, or later trials, samples from each cavity should be separated and checked individually.
For example:
| Check | C1 | C2 | C3 | C4 |
|---|---|---|---|---|
| Filling | OK | OK | OK | OK |
| Dimension A | OK | OK | High | OK |
| Flash | None | None | Slight | None |
| Ejection | OK | OK | OK | OK |
In this example, cavity 3 clearly needs attention.
Without cavity separation, mixed samples may hide this difference.
Therefore, mold trial evaluation should not focus only on whether a few selected samples look good.
Instead, each cavity should be checked on its own.
Multi-Cavity Injection Molding Needs Cavity Balance
Cavity identification helps find problems.
However, the real goal is still to make all cavities behave as similarly as possible.
A good multi-cavity mold should have reasonable balance in:
- Filling
- Packing
- Cooling
- Ejection
- Part weight
- Dimensions
If one cavity always needs a different condition from the others, the mold should be checked.
The molding machine normally runs one set of parameters for all cavities.
Therefore, cavity 1 cannot usually run at one injection pressure while cavity 4 runs at another.
Because of this, the mold itself needs enough balance to let all cavities work inside the same process range.
This is closely related to the injection molding process window during mass production.
Multi-Cavity Injection Molding and Mold Maintenance
Cavity numbers also make mold maintenance easier.
Suppose a customer reports that parts marked “7” have increasing flash.
Instead of checking the complete mold first, the technician can begin with cavity 7.
For example, the inspection may include:
- Parting surface
- Insert
- Gate
- Ejector pin
- Vent
- Local cooling
If the defect is confirmed in cavity 7, the repair can be much more targeted.
For long-running multi-cavity injection molding projects, cavity-level records are especially useful.
This is because wear does not always develop evenly across the mold.
For example, one insert may wear faster because of material flow, fitting, or cooling differences.
As the mold gets older, these differences can become more obvious.
Regular injection mold wear inspection can help find these changes before they cause repeated production problems.
Where Should the Cavity Number Be Placed?
Cavity numbers should be placed where they are easy to read but do not affect the product.
Good locations may include:
- Inside surfaces
- Bottom surfaces
- Hidden assembly areas
- Non-cosmetic ribs
- Internal walls
For cosmetic parts, avoid placing the number on a visible outer surface unless the drawing allows it.
For consumer products, the mark may need to be very small or hidden inside the housing.
By contrast, functional industrial parts often allow a more visible cavity number.
In either case, the number should remain clear after molding.
Keep Cavity Numbering Simple
There is usually no need to make the system complicated.
For a four-cavity mold:
1 / 2 / 3 / 4
is normally enough.
However, larger projects may use several identical molds.
In that case, a combined system can be more useful.
For example:
- M1-C1
- M1-C2
- M2-C1
- M2-C2
Here, “M1” identifies the mold and “C1” identifies the cavity.
As a result, the part can be traced to both the mold and the exact cavity.
What If the Product Cannot Have a Visible Cavity Number?
Some products cannot accept an obvious molded number.
This may be because of:
- Cosmetic requirements
- Very small part size
- Optical requirements
- Customer drawing restrictions
In these cases, another identification method can be used.
For example, cavities may use very small dots, symbols, or hidden marks.
Most importantly, the supplier and customer should agree on the method before mold completion.
Otherwise, adding identification later may require extra machining or rework.
Cavity Identification Is Especially Important for High-Volume Production
For very low-volume prototype production, cavity identification may be less important.
However, its value increases during long-term multi-cavity injection molding production.
Thousands or even millions of parts may be produced.
During that time:
- Components wear
- Gates change
- Cooling channels become dirty
- Inserts are repaired
- Ejector pins are replaced
- Mold settings change
Because of this, one cavity may slowly begin to behave differently from the others.
A cavity number creates a simple link between the finished part and the physical cavity inside the mold.
Therefore, future troubleshooting becomes much easier.
Multi-Cavity Injection Molding Sample Inspection
When approving a multi-cavity mold, buyers should avoid receiving only a mixed bag of samples.
Instead, samples should be identified by cavity.
For important dimensions, inspection reports should also show which cavity was measured.
This makes it possible to see whether:
- One cavity is consistently larger
- One cavity has more flash
- One cavity fills differently
- One cavity has higher part weight
- One cavity is closer to tolerance limits
A mixed report can hide these differences.
Therefore, cavity-based inspection is especially useful before approving the mold for long-term injection molding production.
For buyers using multi-cavity injection molding for continuous production, cavity identification improves traceability without adding much complexity to the mold or part.
Do Not Reject the Whole Mold Because of One Cavity
Cavity identification also helps avoid unnecessary mold changes.
Suppose a 16-cavity mold has one cavity with a minor problem.
Without clear data, the buyer may assume the entire mold is unstable.
However, inspection may show that 15 cavities are stable and only cavity 9 needs adjustment.
In that case, the problem is much easier to manage.
The moldmaker can focus on cavity 9 instead of changing areas that already work correctly.
As a result, repair time is shorter and the risk of creating new problems is lower.
Final Thoughts
Multi-cavity injection molding works best when every cavity can be evaluated separately.
A small cavity number may look unimportant. However, it can save a lot of time when a quality problem appears.
It helps buyers and suppliers quickly see whether a defect affects:
- One cavity
- Several cavities
- Or the complete molding process
This is useful for dimensional problems, flash, short shots, gate defects, surface issues, and long-term mold wear.
Therefore, cavity identification should be considered during mold design rather than added only after production problems appear.
When defects can be traced to the correct cavity, troubleshooting becomes faster. Maintenance is also more targeted, and production data becomes much more useful.