
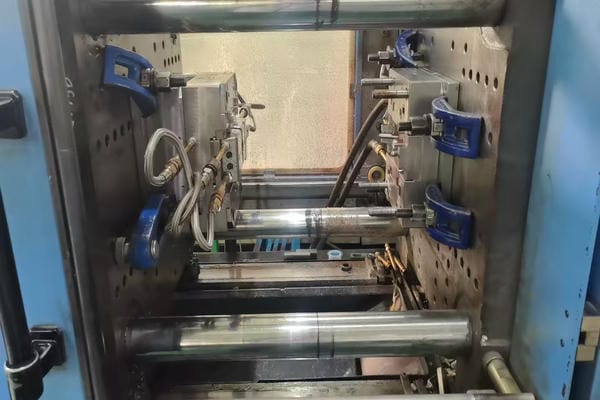
A plastic injection molding machine turns plastic pellets into finished molded parts through a controlled cycle of melting, injection, packing, cooling, and ejection. For buyers and engineers, understanding this process helps explain why machine size, clamp force, screw design, material, mold structure, and process settings all affect part quality. A molding machine does much more than simply push melted plastic into a mold. Every stage must work with the mold design and material behavior. When one stage is unstable, defects such as short shots, flash, sink marks, warpage, burn marks, or dimensional changes can appear.
What Does a Plastic Injection Molding Machine Actually Do?
A plastic injection molding machine performs four main jobs during every molding cycle: it melts plastic, injects it into the mold, holds the mold closed, and ejects the finished part.
The machine works together with the injection mold. The machine supplies heat, pressure, movement, and clamp force, while the mold forms the final part shape.
The basic process is:
- Plastic pellets enter the barrel.
- The screw rotates and melts the material.
- The mold closes.
- Melted plastic is injected into the cavity.
- Holding pressure packs the part.
- The part cools inside the mold.
- The mold opens.
- The ejector system pushes the part out.
- The machine prepares for the next cycle.
Although this sounds simple, each step affects the next one.
For example, if the plastic does not melt evenly, the cavity may not fill correctly. If clamp force is too low, flash may appear. If cooling is poor, the part may warp after ejection.
This is why the molding machine and the injection mold must be evaluated as one complete system.
What Are the Main Parts of an Injection Molding Machine?
Most machines have two major sections:
- Injection unit
- Clamping unit
The injection unit melts and pushes the plastic.
It normally includes:
- hopper;
- barrel;
- screw;
- heater bands;
- nozzle;
- drive system.
The clamping unit controls the mold.
It includes:
- fixed platen;
- moving platen;
- tie bars;
- clamp mechanism;
- ejector system.
The machine controller connects both systems and controls pressure, speed, temperature, stroke, and timing.
Why Does Machine Size Matter?
A machine must match the mold and molded part.
A machine that is too small may not provide enough:
- shot size;
- clamp force;
- platen space;
- mold opening stroke;
- ejector stroke.
A machine that is much too large may also create problems. It can increase cost and reduce process efficiency.
For RFQ review, Fentor Mold normally checks part size, mold size, material, projected area, shot weight, and required clamp force before selecting a production machine.
How Does the Plastic Injection Molding Machine Melt the Material?
The plastic injection molding machine begins the molding process by feeding plastic pellets from the hopper into a heated barrel.
Inside the barrel, a rotating screw moves the pellets forward.
Heat comes from two main sources:
- barrel heaters;
- friction created by the rotating screw.
The goal is not only to make the plastic hot. The machine must create a stable and even melt before injection.
Different materials need different melt temperatures.
For example:
| Material | General Processing Behavior |
|---|---|
| PP | Easy flow, relatively low melt temperature |
| ABS | Good general molding performance |
| PC | Higher temperature and sensitive to overheating |
| PA | Often needs careful drying |
| POM | Requires stable temperature control |
| PC/ABS | Needs balanced temperature and shear |
The exact settings depend on the material grade and part design.
How Does the Screw Prepare the Next Shot?
While one molded part is cooling, the screw often starts rotating.
As it rotates, plastic melts and collects in front of the screw.
The screw slowly moves backward as more melt builds up.
Once the required shot volume is ready, the screw stops rotating.
This prepared melt will be used for the next injection cycle.
The machine must control shot size carefully. Too little material can cause a short shot. Too much can increase pressure and create flash or over-packing.
Why Is Material Drying Important?
Some plastics absorb moisture from the air.
Examples include:
- PC;
- PA;
- PBT;
- PET;
- some engineering plastics.
If wet material enters the machine, moisture may create:
- silver streaks;
- bubbles;
- poor surface quality;
- reduced strength;
- material degradation.
The injection molding machine cannot correct poor material preparation.
Therefore, drying conditions must be controlled before the pellets enter the hopper.
How Does the Plastic Injection Molding Machine Fill the Mold?
Once the mold closes, the plastic injection molding machine moves the screw forward like a plunger.
The screw pushes molten plastic through:
Nozzle → sprue or hot runner → runner → gate → cavity
Injection speed and pressure control how quickly the cavity fills.
This stage can happen in less than a second for small parts, while larger parts may take longer.
The goal is to fill the cavity before the melt cools too much.
If filling is too slow, the plastic may freeze before reaching the end of the cavity.
If filling is too fast, the process may create:
- burn marks;
- jetting;
- excessive shear;
- air traps;
- flash.
Good filling therefore depends on both machine settings and mold design.
What Happens During Holding Pressure?
After the cavity is nearly full, the machine changes from filling pressure to holding pressure.
This stage is also called packing.
The plastic shrinks as it cools.
Holding pressure pushes extra material into the cavity to compensate for this shrinkage.
Correct packing helps improve:
- part weight;
- dimensions;
- surface quality;
- sink mark control;
- dimensional repeatability.
However, too much holding pressure can also create problems.
Possible results include:
- flash;
- high internal stress;
- difficult ejection;
- increased part weight.
This is why pressure must be optimized during mold trials.
A structured injection mold trial process helps engineers find a stable filling and packing window before mass production.
Why Is Mold Venting Important During Filling?
Air is already inside the cavity before plastic enters.
That air must escape.
The mold uses vents around locations such as:
- parting lines;
- ejector pins;
- inserts;
- end-of-fill areas.
Poor venting may cause:
- burns;
- short shots;
- high pressure;
- unstable filling.
Machine pressure alone cannot solve a bad venting design.
Increasing injection pressure may even make the defect worse.
Therefore, mold design and machine settings must work together.
How Does Cooling Control the Final Plastic Part?
After filling and packing, the plastic injection molding machine keeps the mold closed while the part cools.
For many molded parts, cooling is the longest stage of the whole cycle.
The cooling system inside the mold removes heat from the plastic.
Typical mold cooling uses water channels around the cavity and core.
A good cooling system should remove heat evenly.
If one area stays hotter than another, the part may shrink unevenly.
This can cause:
- warpage;
- dimensional changes;
- long cycle time;
- uneven surface appearance.
This is why cooling design is a major part of injection molding production, especially for medium and high-volume projects.
When Can the Machine Open the Mold?
The machine should not open the mold until the part is strong enough to keep its shape.
If the part ejects too early, it may:
- deform;
- bend;
- leave ejector marks;
- stick to the mold.
Waiting too long also has a cost.
Extra cooling time increases cycle time and part price.
Engineers therefore try to find the shortest safe cooling time.
For example, reducing a cycle from 35 seconds to 30 seconds can create a large production saving over hundreds of thousands of parts.
How Does Mold Temperature Affect Quality?
Mold temperature affects more than cooling speed.
It can also change:
- surface finish;
- weld line appearance;
- shrinkage;
- flow length;
- dimensional stability.
Some engineering plastics need a warmer mold to achieve good surface quality and proper material performance.
Using the lowest possible mold temperature is not always the best choice.
The correct setting depends on material, geometry, surface requirements, and cycle goals.
How Does a Plastic Injection Molding Machine Eject the Part?
At the end of the cycle, the plastic injection molding machine opens the mold and activates the ejector system.
The molded part must first remain on the correct mold half.
Usually, it stays on the core side.
Then the machine ejector pushes the mold ejector plate forward.
This moves components such as:
- ejector pins;
- sleeves;
- stripper plates;
- lifters.
The part separates from the mold and can be removed by an operator or robot.
After ejection, the ejector system returns and the mold closes again.
The next cycle starts immediately.
What Can Cause Difficult Ejection?
Poor ejection may come from:
- insufficient draft;
- high shrinkage around the core;
- rough mold surfaces;
- deep ribs;
- too little ejector area;
- incorrect ejector position;
- part deformation.
Increasing ejector force is not always the correct solution.
Too much force can damage the part or bend ejector pins.
In many cases, the mold design needs improvement.
For complex parts, Fentor Mold reviews draft, ribs, undercuts, ejection position, and mold movement during DFM before tooling starts.
What Happens When a Part Has Undercuts?
Undercuts cannot always eject straight from the mold.
The mold may need:
- sliders;
- lifters;
- collapsible cores;
- unscrewing systems.
These mechanisms add movement to the molding cycle.
For example, a collapsible core may need to move inward before part ejection.
This means the injection molding machine must provide the correct sequence and enough mold opening stroke.
How Do Engineers Set Up the Machine for Stable Production?
A plastic injection molding machine does not automatically produce good parts just because the mold fits the machine.
Engineers need to create a stable process window.
Important settings include:
| Setting | Main Effect |
|---|---|
| Melt temperature | Material flow and degradation |
| Mold temperature | Cooling, surface, shrinkage |
| Injection speed | Filling behavior |
| Injection pressure | Ability to fill cavity |
| Holding pressure | Shrinkage and part weight |
| Holding time | Packing stability |
| Cooling time | Cycle time and deformation |
| Screw speed | Melt preparation |
| Back pressure | Melt mixing and consistency |
| Clamp force | Prevents mold opening |
During T1, engineers may adjust several of these settings.
However, process settings should not hide a mold problem.
For example, if a cavity requires extremely high injection pressure because the gate is too small, simply increasing pressure may not be a reliable long-term solution.
The better approach is to review the mold.
What Should Buyers Include in an RFQ?
To select the correct machine and molding process, buyers should provide:
- 3D part data;
- 2D drawing;
- plastic material;
- annual quantity;
- required tolerance;
- part weight if known;
- appearance requirements;
- expected production volume.
This information helps the supplier estimate machine size, cavity number, cycle time, and part cost.
For projects that still need design validation, prototype injection molding can also help confirm part behavior before full production tooling.
FAQ About Plastic Injection Molding Machines
How Long Does One Injection Molding Cycle Take?
It depends on part size, wall thickness, material, mold temperature, and cooling design.
Small thin-wall parts may have very short cycles.
Large or thick parts may need much longer cooling time.
The correct cycle should balance part quality and production efficiency.
How Is Injection Molding Machine Tonnage Selected?
Machine tonnage mainly refers to clamp force.
Engineers calculate the projected area of the molded part and runner system, then consider the expected cavity pressure.
The machine must provide enough force to keep the mold closed during injection.
Can One Machine Run Different Plastic Materials?
Yes.
Most molding machines can process many thermoplastics, but the barrel, screw, temperature range, and machine condition must suit the material.
The machine must also be cleaned properly when changing materials.
Does a Bigger Injection Molding Machine Make Better Parts?
No.
A bigger machine is not automatically better.
The best machine is one that correctly matches the mold, shot size, clamp force, and production requirements.
Using a machine that is much too large may increase manufacturing cost.
Conclusion
A plastic injection molding machine completes a repeating cycle of material preparation, mold closing, injection, packing, cooling, opening, and ejection. Each step affects the quality of the final plastic part.
However, the machine is only one part of the system. Mold design, material selection, drying, cooling, venting, gate design, and process settings all work together.
For buyers, understanding the full cycle makes it easier to discuss machine tonnage, cycle time, defects, part cost, and production capacity with a supplier.
If you are developing a plastic part and need support with mold design, tooling, machine selection, or production planning, contact us to discuss your project requirements.